Everything you need to set up and run rentals on Shopify, from first install to bookings, late fees, try-ons and in-store rentals. Many guides include a short video.
No guides match that search. Try another word, or contact support.
Getting started
Getting started
Before you start: disable other rental apps
Before using The Dress Rental App, disable or uninstall any other rental apps. Two rental apps on one store will conflict on your product pages and at checkout.
In Shopify Admin, go to Settings → Apps and sales channels.
Open each existing rental app and disable or uninstall it.
Go to Online Store → Themes → Customize.
Remove any old rental app blocks from your templates and turn off their app embeds.
Save your theme changes.
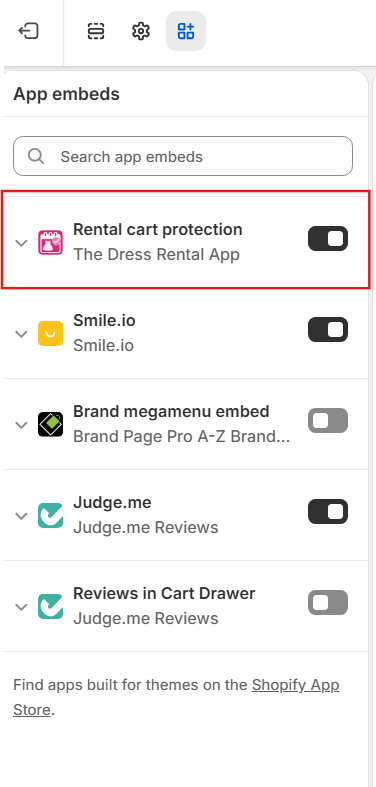
Under App embeds, make sure Rental cart protection (The Dress Rental App) is switched on.
Open a product page and confirm the widget works.
Theme editor → App embeds: turn on Rental cart protection.
The fastest way to get going. Open Setup guide from the app's Dashboard, answer nine questions about your shop, and the app configures your rental rules for you.
What it asks
How you stock dresses:One of each dress, or Multiple copies of some dresses (tracked separately by size or variant).
Refundable bond: no bond, a flat fee, or a percentage of the rental price.
Cleaning fee, rental length and prep buffer between rentals.
Delivery methods: Shipping (post), Local delivery, Customer pickup, or Something else.
Store profile, store policies (terms URL) and which booking form fields to collect.
What it does for you
Sets your rental rules: availability, bonds, cleaning and buffers.
Sets storefront defaults: brand, policies and booking fields.
Prepares the fee products used for bonds and cleaning fees.
Finish setup
Add rental inventory: click Open products to import from Shopify, or Import CSV.
Enable the Rental Widget: click Open theme editor, add the Rental Widget app block to your product template, save, then confirm in the app.
Storefront changes are never published automatically. Nothing appears on your live store until you add the widget in the theme editor.
Getting started
Setup checklist
Prefer to set things up manually? Follow these steps in order. Setting your defaults before adding products means every dress you import picks them up automatically.
Settings → General: store profile, policies and holiday mode. Guide
Test the full booking flow: choose dates on a product, add to cart, check out, and confirm the booking appears in Bookings.
Where things are
In Shopify Admin, the app's menu has Dashboard, Rental Products, Bookings, Try-ons, Quote Requests, Profit Tracker, Settings, Booking Fields & Add Ons, Pricing and Support & Tutorials. Settings has tabs for General, Rental, Delivery, Bookings, Notifications, Data and Automation.
Getting started · Theme
Add the rental calendar to your products
Place the rental booking calendar on your Shopify product pages so customers can pick their dates.
In Shopify Admin, go to Online Store → Themes → Customize.
Open App embeds and switch on Rental cart protection. This stops customers editing rental quantities or removing fee items in the cart.
Open your product template and add the Rental Widget app block where the calendar should appear.
Save, then open a rental product on your storefront to check the calendar shows.
The widget only appears on products you've imported into Rental Products. On other products it hides itself, so it's safe to add the block to a shared product template.
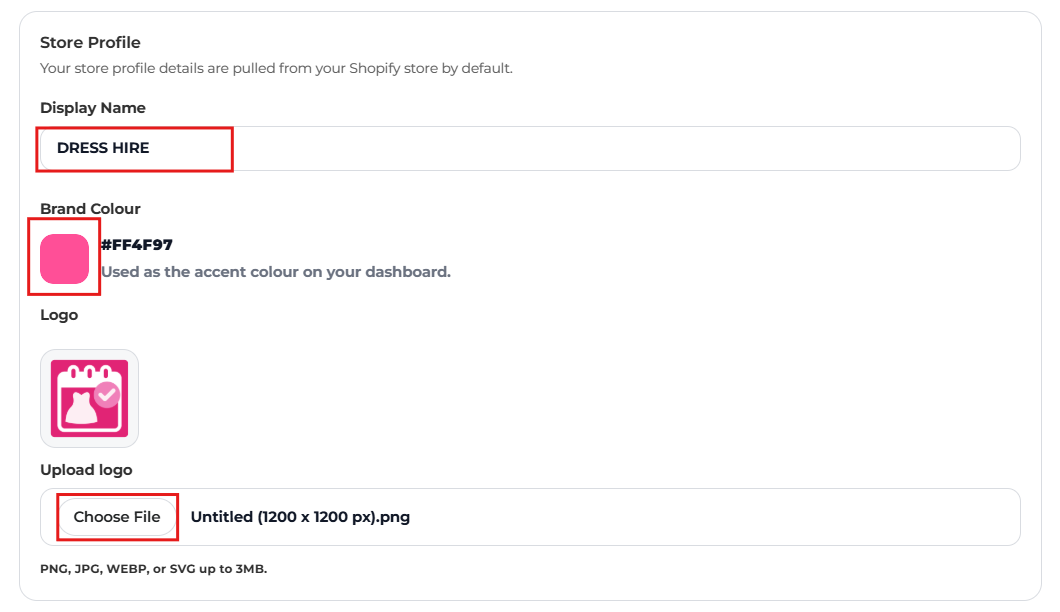
Your store profile details are pulled from your Shopify store by default. You can change them here.
Display Name
Your store's name.
Brand Colour
Used as the accent colour on your dashboard.
Logo
Upload a PNG, JPG, WEBP or SVG up to 3MB.
Store Profile: display name, brand colour and logo.
Currency
Storefront widgets follow Shopify's currency settings, so customer-facing prices and symbols stay consistent. Your store currency is synced from Shopify; change it in Shopify, and control customer-facing currencies with Shopify Markets.
Store policies
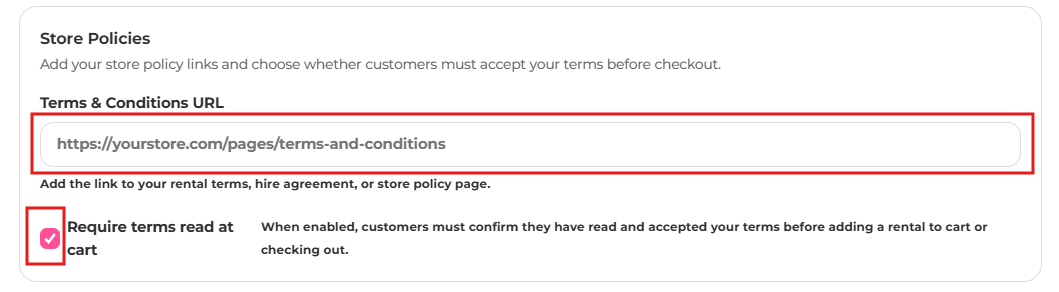
Add the link to your rental terms, hire agreement or store policy page in Terms & Conditions URL. Tick Require terms read at cart to make customers confirm they've read and accepted your terms before adding a rental to cart or checking out. Terms checkbox guide
Booking status tracking
Choose whether Shopify order activity or the app controls booking statuses. Tick Track bookings with Shopify instead of The Dress Rental App and:
fulfilling the order in Shopify marks the rental as Shipped,
archiving the order completes it, and
a full refund closes it as Cancelled & Refunded.
Leave it off to move bookings through statuses yourself in Bookings.
Holiday mode
Temporarily stop all new bookings across your store for one or more date ranges. Holiday mode guide
About this app & danger zone
View Privacy Policy & Terms of Service opens the app's own policies (separate from your store's rental terms). Reset settings returns all settings to their defaults. Use it with care.
Settings → Rental
Rental settings
Your store-wide rental rules. They apply to new rental products unless you override them on an individual product.
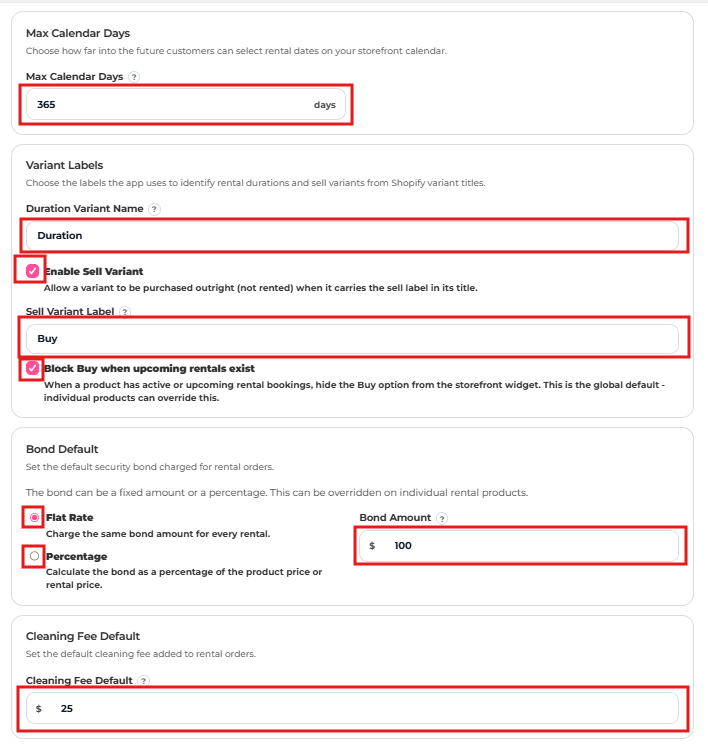
Max calendar days
How far into the future customers can book. For example, 365 lets customers book up to a year ahead.
Reserve button destination
Where customers go after they reserve a rental. The rental and its fees are always added to the cart first.
Cart page
Opens the full cart page (the default).
Cart drawer
Opens your theme's cart drawer. If the theme has no compatible drawer, the cart page opens instead.
Checkout
Sends the customer straight to Shopify checkout.
Variant labels
The Shopify option names the app uses to find sizes, rental durations and sell variants.
Size Variant Name
The option name used for sizes. The default is Size. Options named Duration are never shown as sizes.
Duration Option Name
Always Duration. Option values can be formatted like 4 Days.
Rental Duration Fallbacks
Up to five comma-separated day counts, for example 2, 4, 7. Only used when a product has no Duration variant.
Enable Sell Variant
Allow a variant to be bought outright (not rented) when its title contains the sell label.
Sell Variant Label
The label to look for, for example Buy. It must be a full slash-separated part of the variant title, so Large / Buy matches.
Block Buy when upcoming rentals exist
Hide the Buy option while a product has active or upcoming rentals. Products can override this.
Rental duration model
How a rental's length is set for products that don't override it:
Fixed durations
Customers choose a rental length (for example 4 or 8 days) from a list, priced per Shopify variant. Guide
Next business day
No duration picker. Customers choose a start date and the return date is set to the next weekday. Guide
Storefront calendar default
What the calendar shows when it first opens: Today's date (the current month), or Next available date (jumps to the first month with a bookable date, skipping fully booked or blocked months).
Price matching
Tick Enable price match requests to show a price match link in the rental widget after customers choose their dates, size and duration. Requests appear in Quote Requests.
Bond default
The default refundable security bond. Choose Flat Rate to charge the same amount on every rental, or Percentage to calculate it from the product or rental price. Products can override this.
Cleaning fee default
Covers standard dry cleaning, laundry or garment care. Products can override this.
Max Calendar Days, Variant Labels, Bond Default and Cleaning Fee Default.
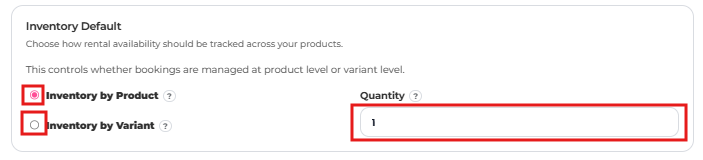
Inventory default
Option
Best for
Inventory by Product
One-off items. The whole product is one rental item. Set Quantity to how many units you own, and the app uses it to prevent overbooking.
Inventory by Variant
Dresses in multiple sizes or colours. Availability is tracked separately for each variant.
Inventory Default: by product or by variant.
Cart rules
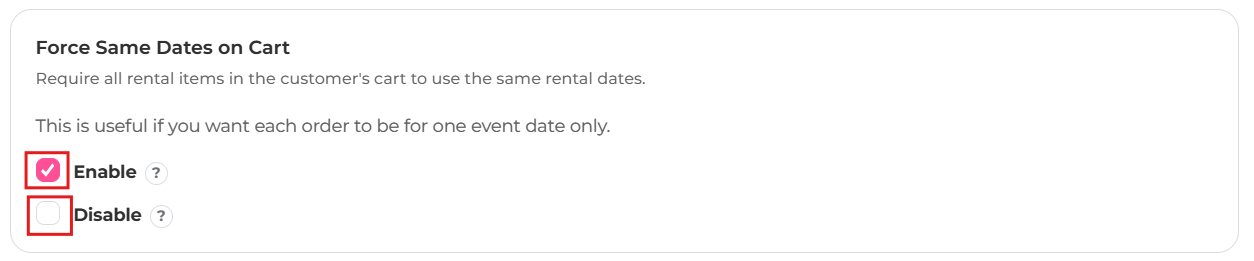
Force Same Dates on Cart
Every rental in the cart must use the same start and return dates. Useful if each order is for one event.
Lock rental quantity to 1
Customers can only rent one unit per product or variant. Recommended for dress hire.
Prevent Duplicate Rentals
Off by default. When on, customers who add a product that's already in their cart see a popup asking them to remove the existing rental first.
Force Same Dates on Cart.Lock Rental Quantity.
Settings → Delivery
Delivery methods & booking dates
Delivery settings control the delivery method names on the product page and how dates are blocked on the storefront calendar.
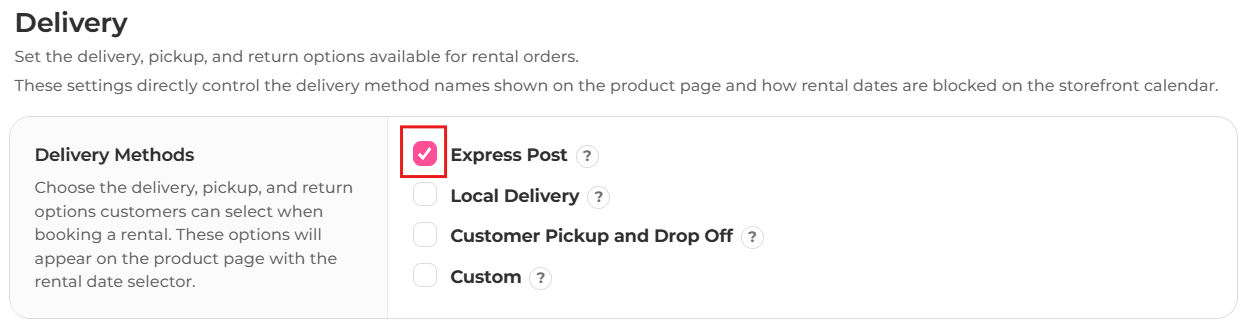
1. Choose your methods
Tick each method you offer:
Express Post
Customers receive and return rentals by post.
Customer Pickup and Drop Off
Customers collect and return in person.
Local Delivery
You deliver locally.
Custom
Your own method, such as courier, stylist delivery or event drop-off.
Use the arrows to set the order shown on the product page. The first enabled method is selected by default.
Delivery Methods.
2. Set each method's rules
Every method has its own settings:
Name displayed to customers
For example Express Delivery, Australia Post or Postal Hire.
Start date label
Shown above the chosen start date, for example Delivery Date, Wear Date or Event Date.
End date label
Shown above the return date, for example Return Date or Post Back Date.
Blocked days from current date
Stop customers booking too soon. Set 2 if you need two days to prepare or ship.
Same-day cutoff time
After this time, today stops counting as a bookable start date. Leave blank for no cutoff.
Default buffer prior to rental
Extra days blocked before the rental for packing or shipping, for example 1–2 days.
Default buffer after rental
Extra days blocked after the rental for return shipping, cleaning or inspection, for example 1–3 days.
Rentals cannot start on
Weekdays customers can't choose as a start date, for example Sunday if you don't ship.
Pickup times
For pickup-style methods, tick Let customers choose a pickup time to show a time selector on the product page:
Days before the start date pickup opens: use 0 to offer pickup on the start date itself.
Available pickup times: add times one per line (for example 9:00am - 11:00am), or generate them from a start time, end time and interval (15, 30 or 60 minutes).
Or tick We will contact the customer to arrange pickup instead to hide the selector and show a note.
Keeps the delivery option at checkout the same as the method chosen on the product page.
Enforce the product-page delivery method at checkout: customers can't switch Express Post to Pickup, or mix methods between rental items.
If the delivery lock fails, show all delivery and pickup options: prevents an empty delivery step at checkout.
Checkout option titles (optional): leave blank to allow any Shopify rate of that type, or add titles to restrict the lock to specific rates or pickup locations.
The status shows Active, Disabled, Needs permission approval or Needs repair. If asked, click Approve app permissions.
Shipping charge for split deliveries
When rental and buy items ship separately, choose how shipping is charged:
Split shipping: charge every shipment
Keeps the first Shopify shipping charge and adds your set amount for each extra rental date range.
Charge the most expensive shipment only
Keeps the highest shipping rate and discounts the cheaper ones.
This works on Basic Shopify by adding a clearly labelled cart charge the buyer approves.
Shopify POS charges
Set the amount added once to the Shopify POS cart for each delivery method. Enter 0 for no charge. POS guide
Weekly booking cut-off
Useful for postage runs. Tick Enable weekly booking cut-off, then set:
Apply to delivery options and pickup locations: which methods it affects.
Cutoff day and Cutoff time: when the cut-off happens each week.
Block bookings through: after the cut-off, dates up to this day are blocked.
Customer message: explains the cut-off on the product page.
Settings → Bookings
Booking settings
Manual bookings
Source name
The label shown on bookings you create in the app.
Default manual status
The starting status for new manual bookings.
Require customer name / email
Manual bookings can't be saved without them.
Allow local-only booking without Shopify order
When off, every manual booking must be linked to a Shopify order. We recommend keeping order linking required, so changes stay anchored in Shopify.
Booking editing
Allow date edits shows a date editor inside each booking so rental dates can be changed.
Late fees
Default late fee amount
The starting late fee for bookings that don't have one yet.
Draft order title
The line item name used on late fee draft orders.
Allow draft order creation
Shows the button that creates a Shopify draft order for a late fee.
Disputes & bond
Enable customer disputes
Shows the Customer Disputes tab inside each booking. Guide
Show refund bond button
Shows the refund bond action in each booking's Payments tab. Guide
Settings → Notifications
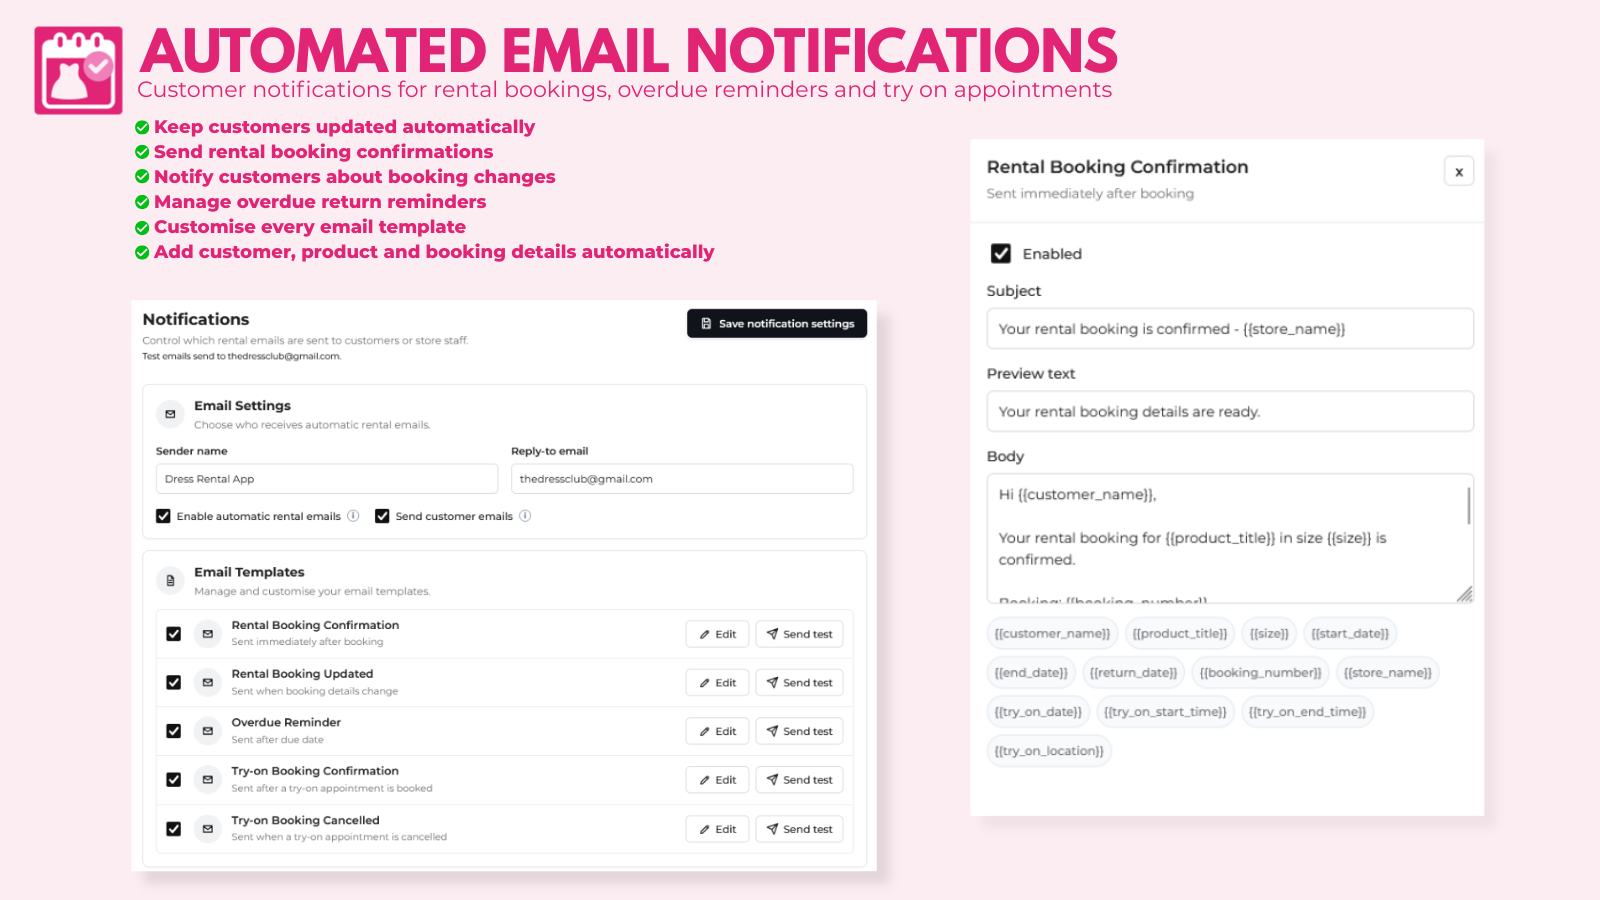
Notifications & email templates
Email settings
Set your Sender name and Reply-to email.
Tick Enable automatic rental emails.
Tick Send customer emails to email customers as well as staff.
Click Save notification settings.
Email templates
Template
When it's sent
Rental Booking Confirmation
Immediately after booking
Rental Booking Updated
When booking details change
Overdue Reminder
After the return date has passed
Try-on Booking Confirmation
After a try-on is booked
Try-on Booking Cancelled
When a try-on is cancelled
Try-on reminder
The day before a try-on
Click Edit to switch a template on or off and change its Subject, Preview text and Body. Use these placeholders to fill in booking details:
Clear selected data, such as all rental products or all try-on appointments. Only for testing or starting over. It never deletes your Shopify products.
Settings → Data.
Settings → Automation
Collection automation
Automatically create Shopify collections and menu links for brands, sizes, colours and styles, so customers can browse your range.
Automation
Reads from (default)
Menu item it fills
Brand
Product vendor
Browse by Brands
Size
Product Size option
Browse by Size
Colour
Shopify category colour (can show swatches)
Browse by Colour
Style
Style type, falling back to title, type or tags
Browse by Style
Set it up
In Online Store → Navigation, create the menu item you want filled, for example Browse by Size.
In the app, go to Settings → Automation and enable the automation.
Choose options such as Create missing collections, Add to navigation and Keep ordered, then pick the menu item.
Optionally change the source field, and add Exceptions (values to ignore, one per line, for example Other).
Save, then click Sync (or Sync All Collections).
The dashboard shows missing collections, menu links, brand images and products missing a size, colour or style. Syncing never deletes collections or menu items.
The first time, the app may ask for extra Shopify permissions (collections and navigation). Reload the app and approve them. You don't need to reinstall.
Rental products
Rental products
Import rental products
Choose which of your Shopify products become rentals.
Important: edit your rental settings first, so they're applied to the dresses you import.
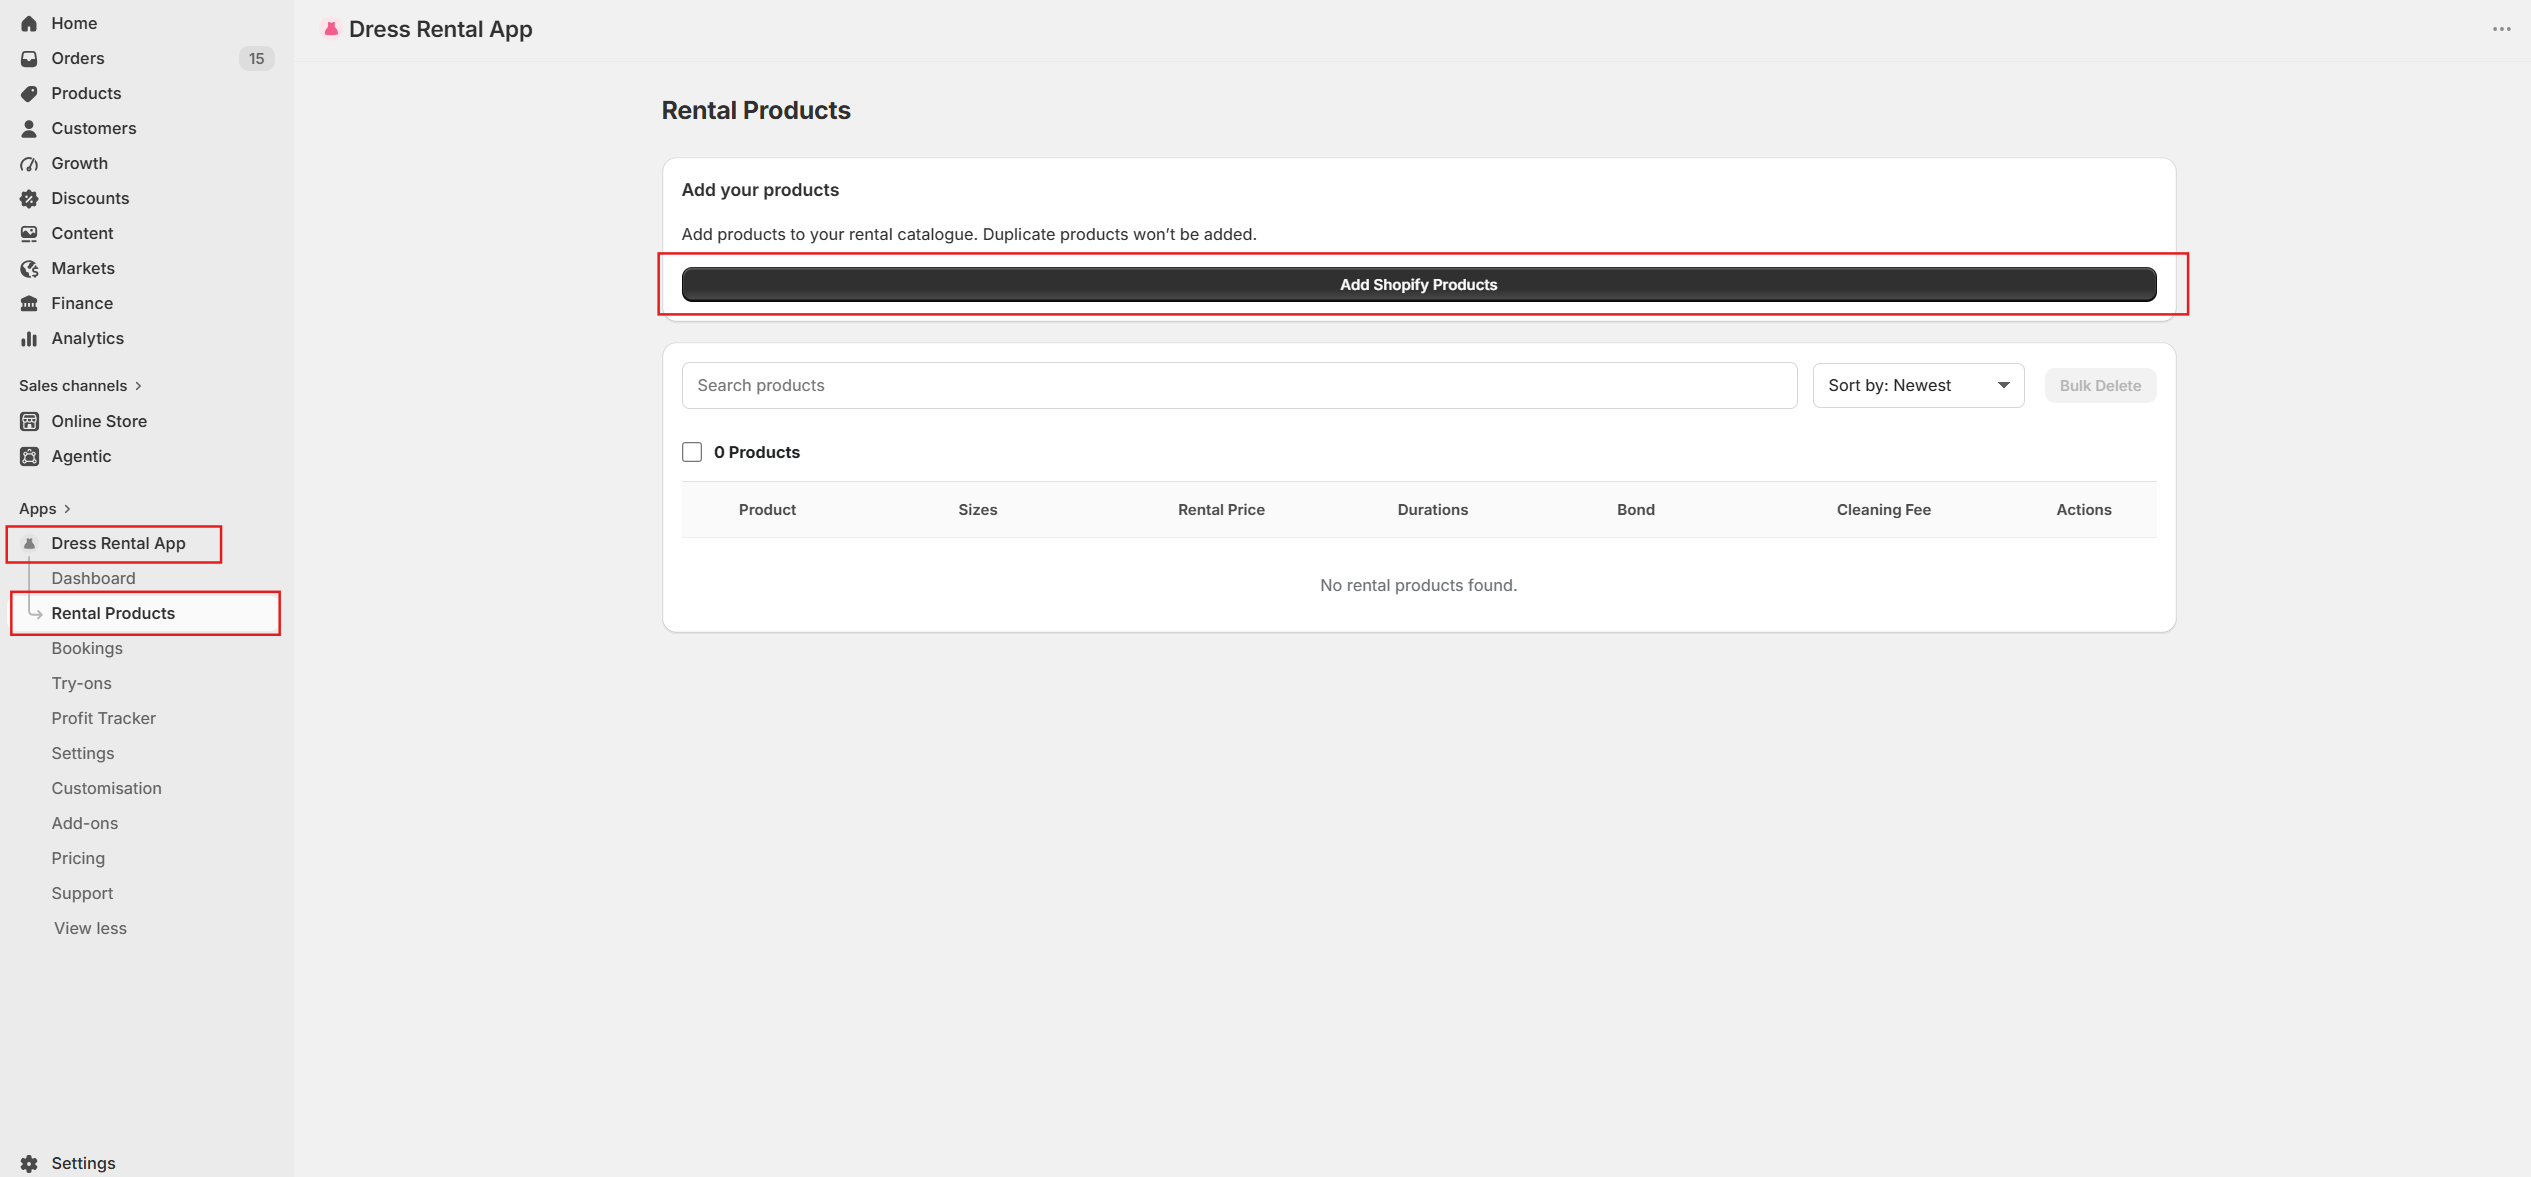
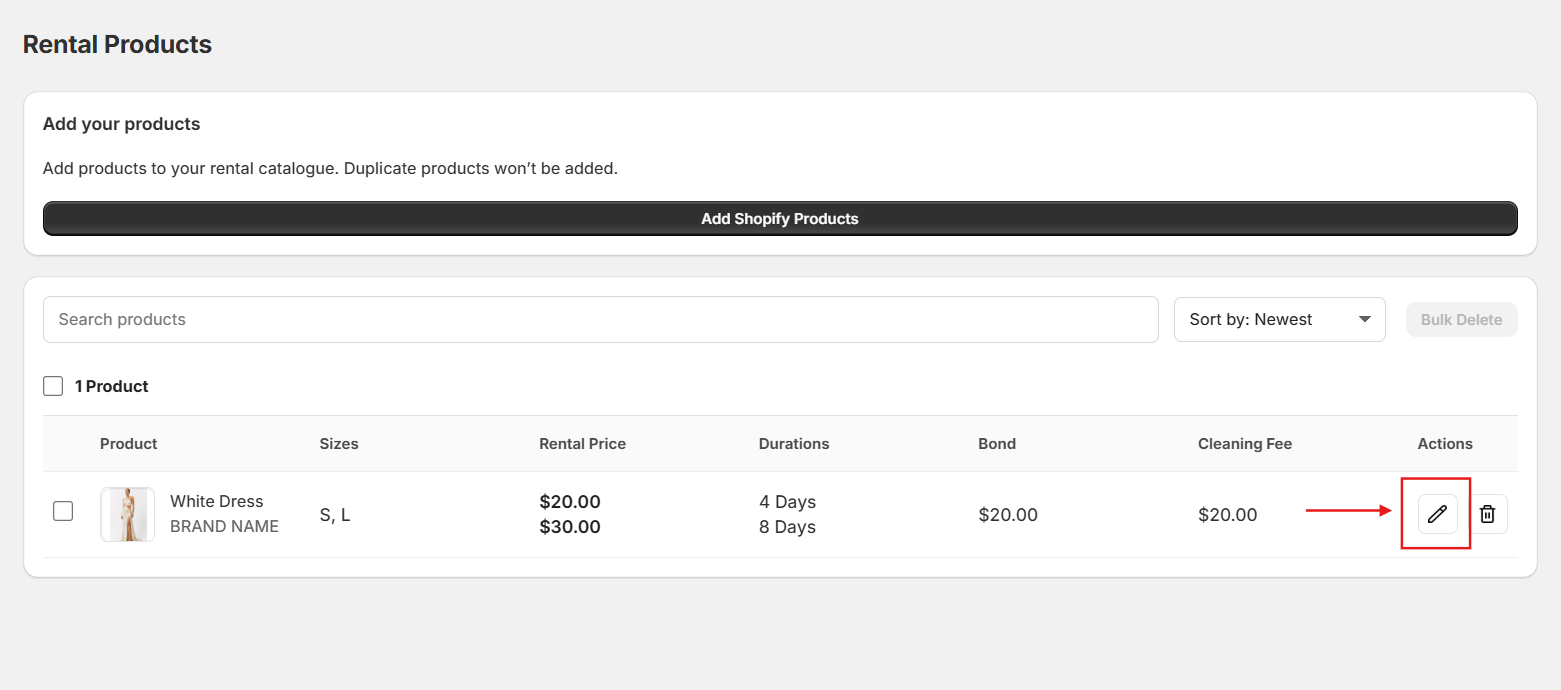
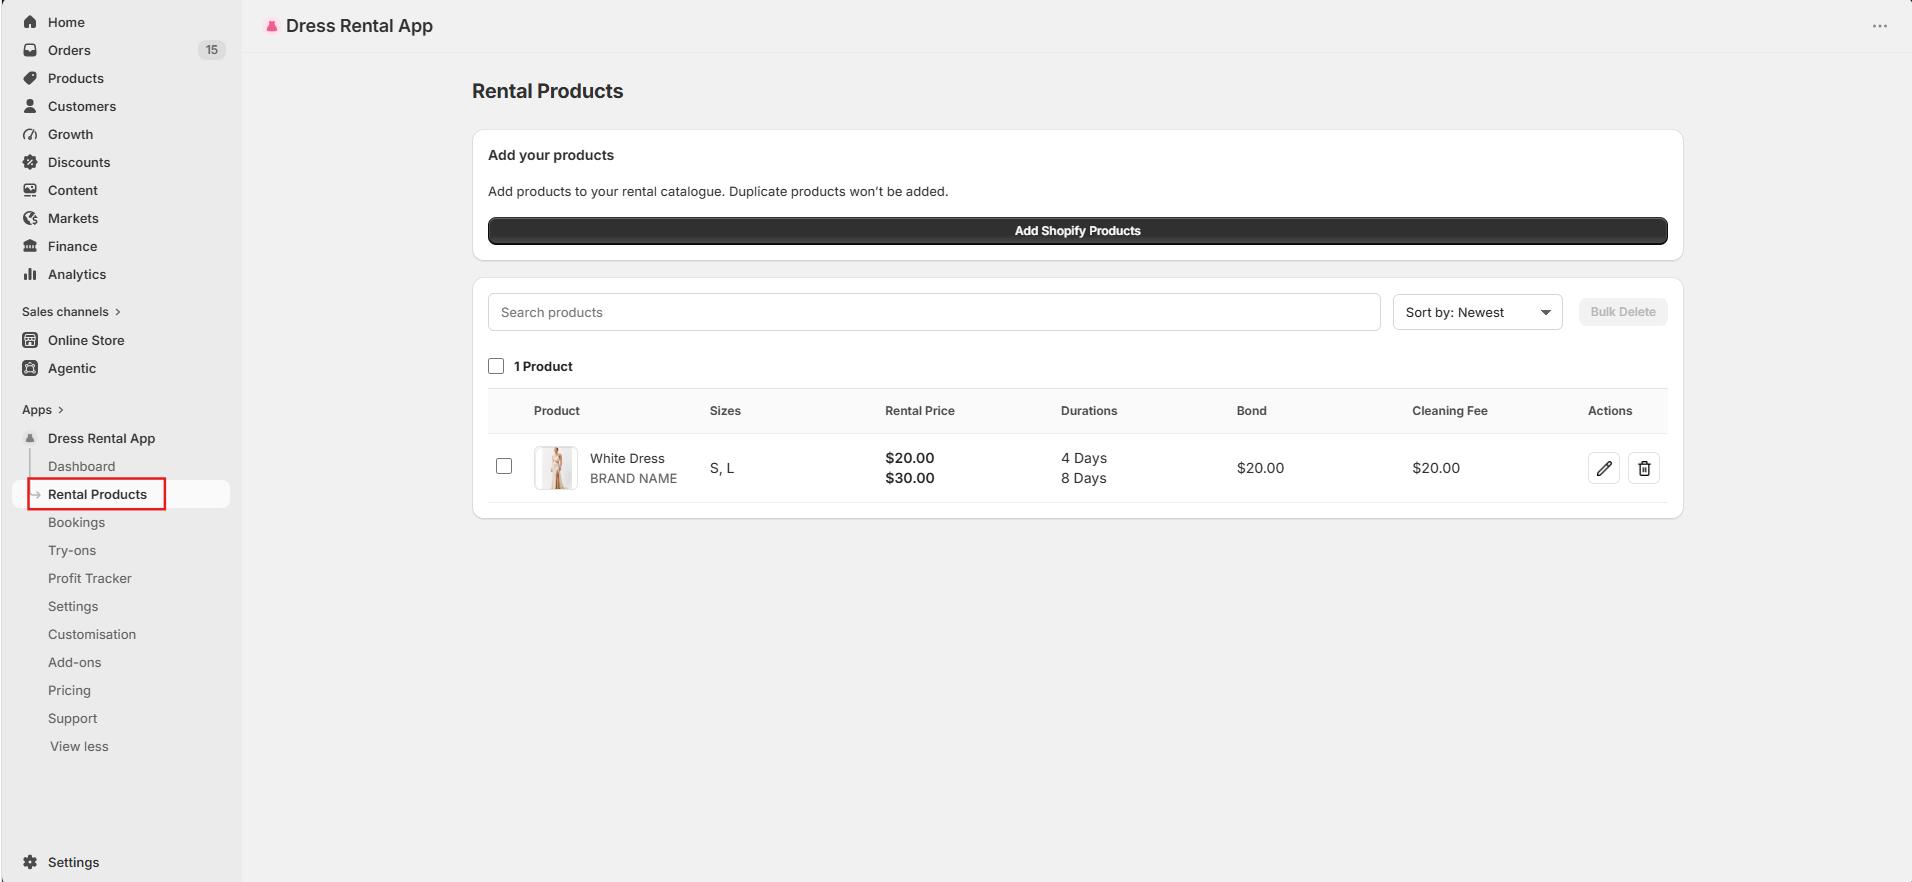
In Shopify Admin, open Dress Rental App and click Rental Products. Then click Add Shopify Products.
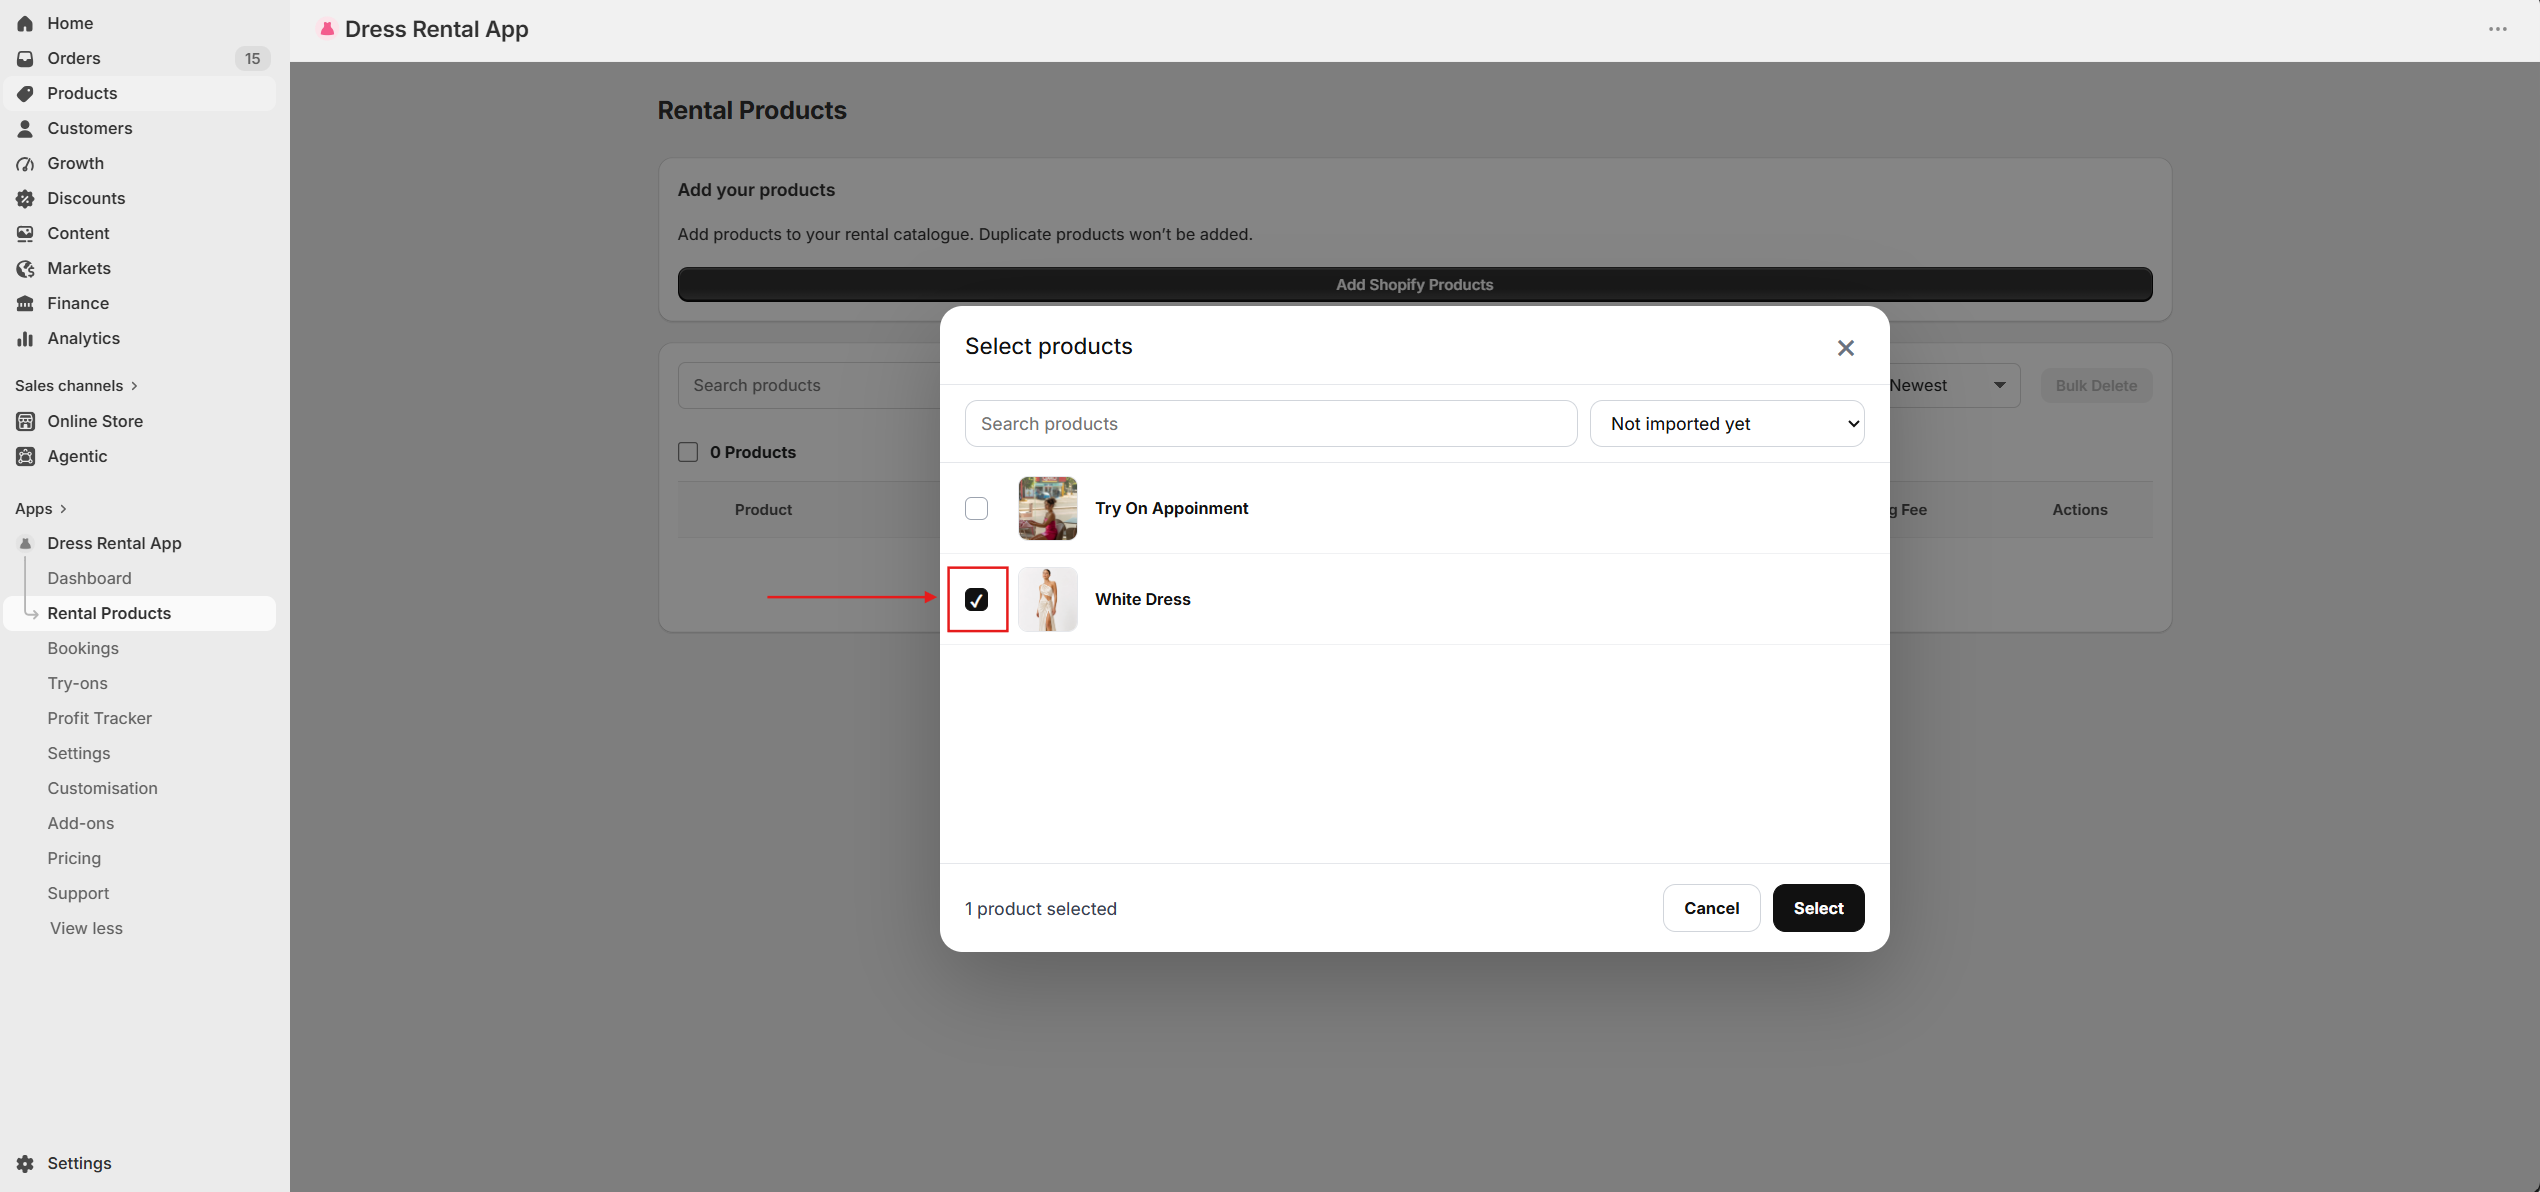
Tick the products you want to rent out and click Select. Filter by Not imported yet to avoid duplicates.
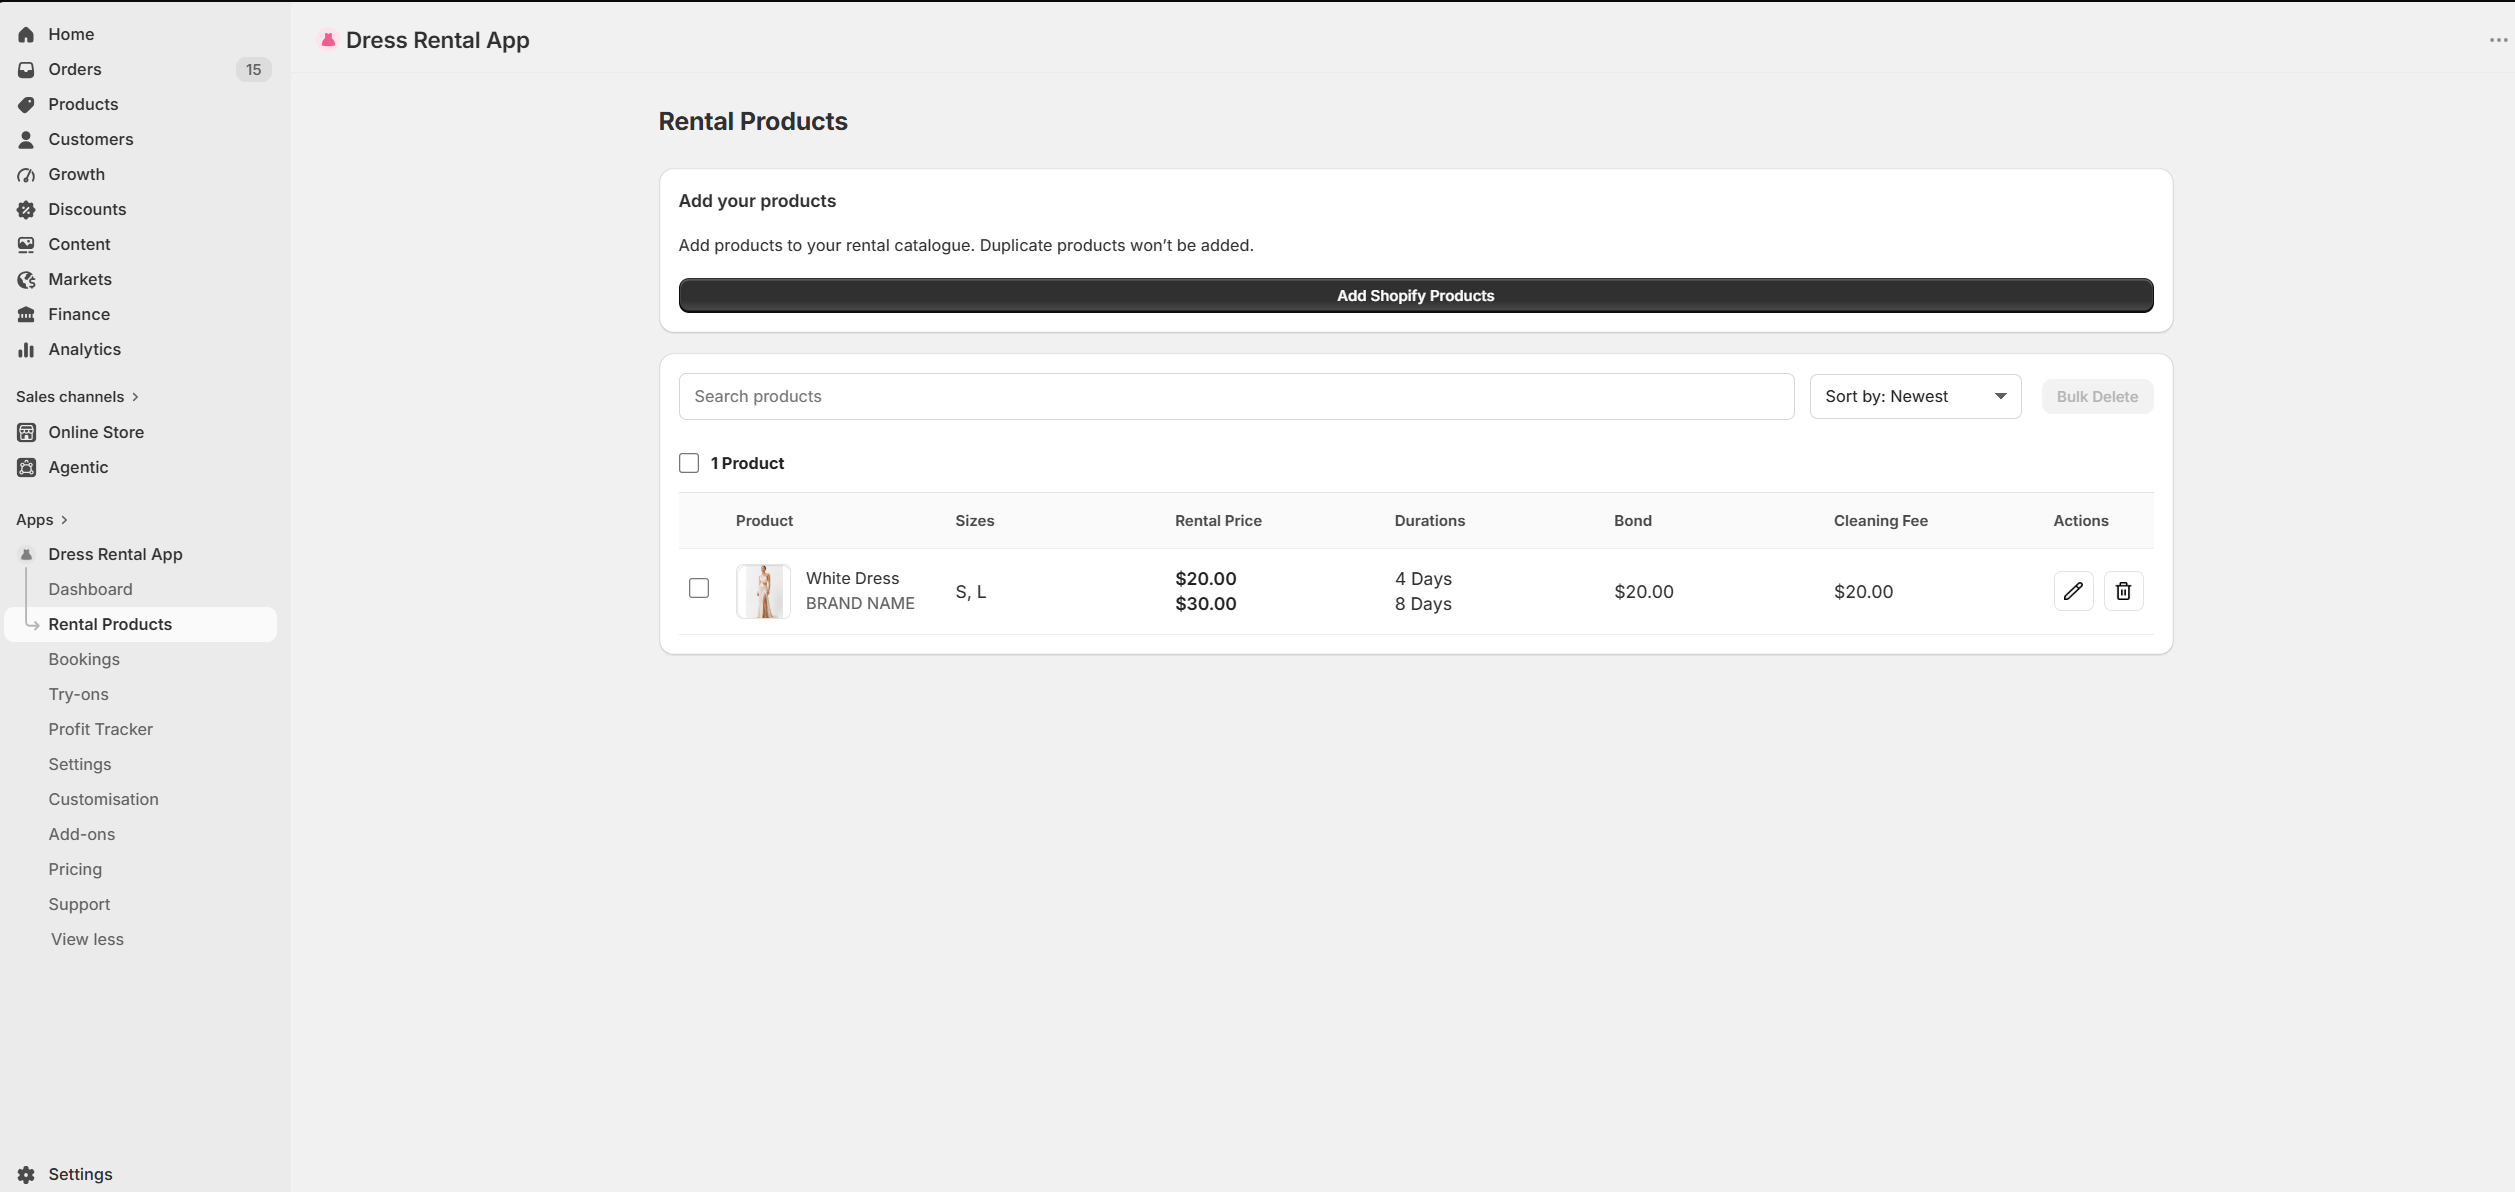
Your products appear in Rental Products with your defaults, showing sizes, rental and selling prices, durations, bond and cleaning fee.
To change settings for one dress, click the pencil icon in the Actions column. Edit a rental product
Rental products · Settings → Data
Bulk import by product type
Import every Shopify product of one product type at once, for example all products with the type Dress Hire. Useful when setting up your store for the first time.
Important: edit your rental settings first, so they're applied to the imported dresses.
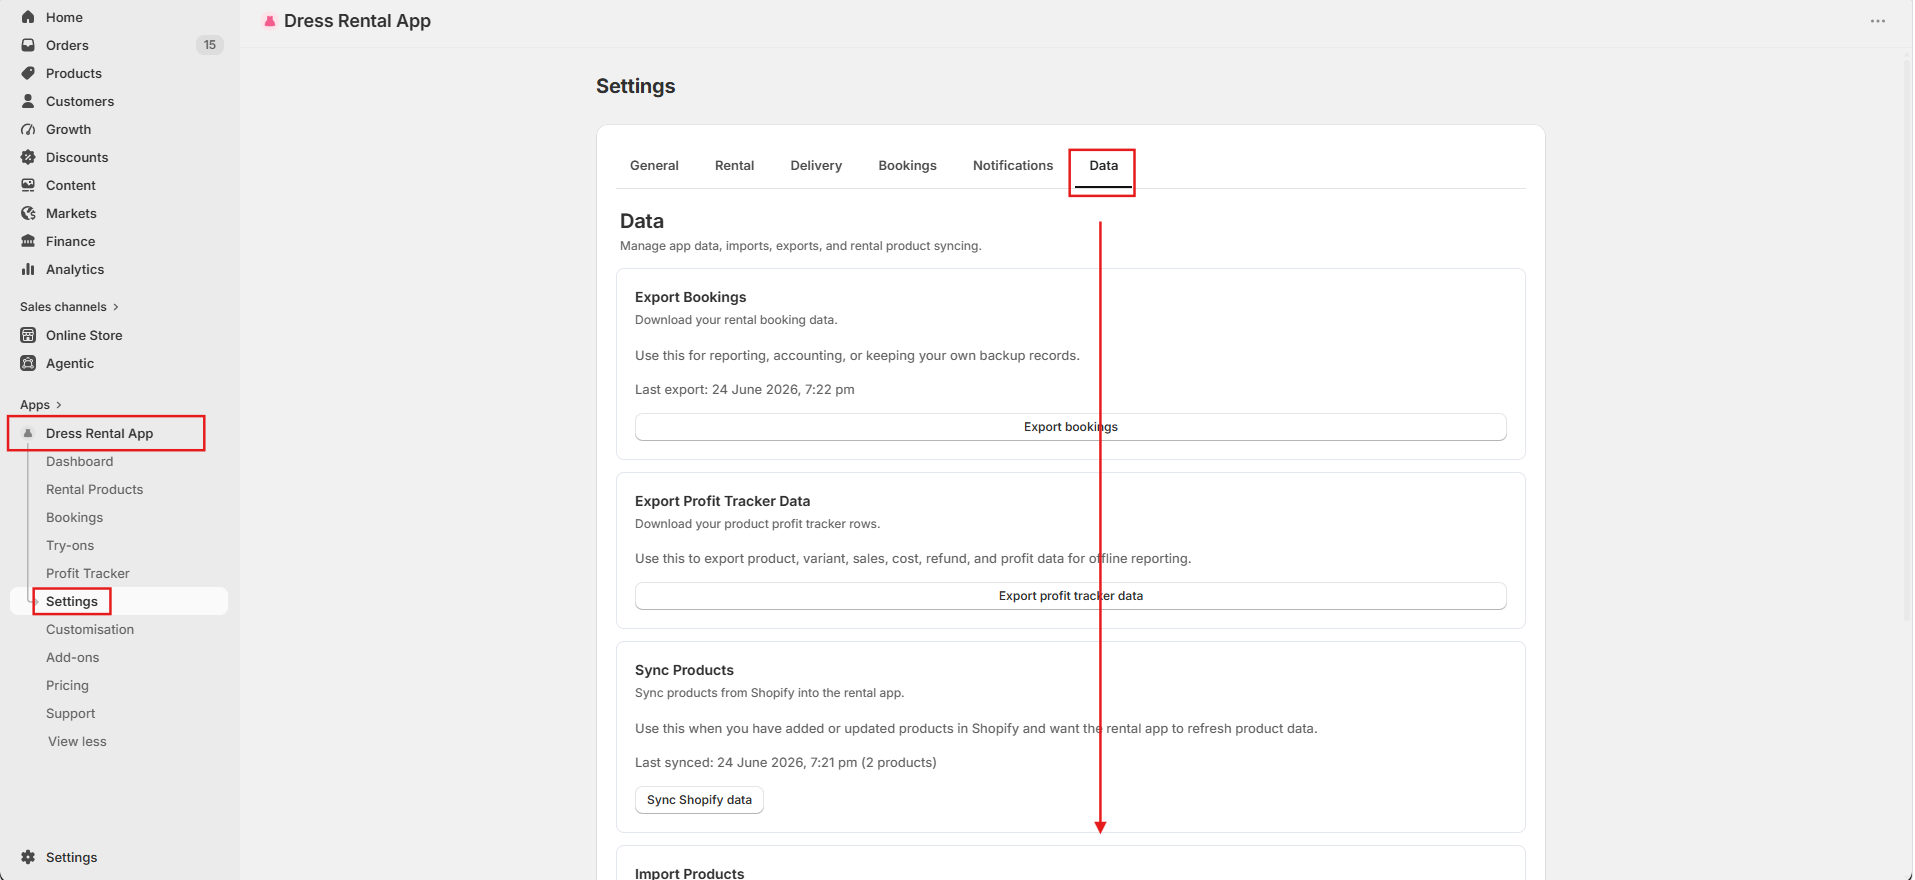
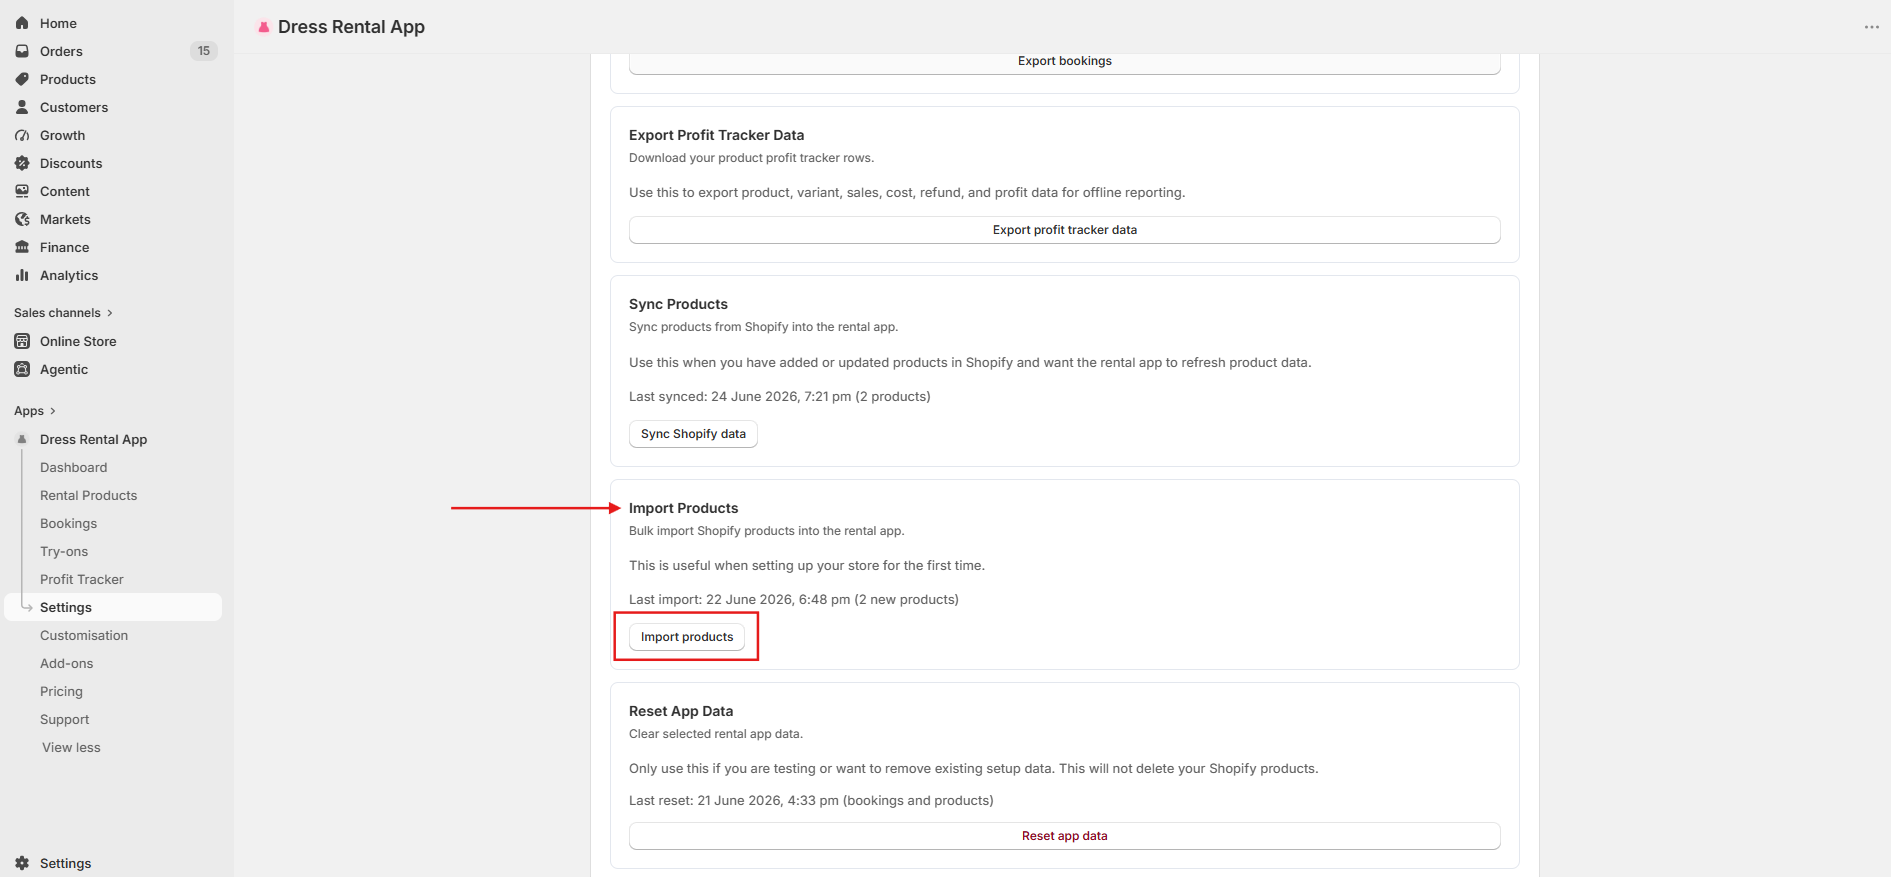
Open Dress Rental App, click Settings, then open the Data tab and scroll down.
In the Import Products card, choose the Shopify Product Type and click Import products. Only exact type matches are added, and products already imported aren't duplicated.
Go to Rental Products to review your dresses and change any settings.
Rental products · Settings → Data
Automatic rental product import
New Shopify products with a chosen Product Type are added to Rental Products automatically, so you don't have to import each new dress.
Turn it on
Go to Settings → Data and find the Automatic Product Import card.
Tick Enable automatic product imports.
Under Shopify Product Type, select the product type to watch.
Click Save automatic import workflow.
How it works
When you create a product, Shopify notifies the app.
The app compares the product's type to your saved type.
If they match exactly, the product is added to Rental Products with your store defaults: duration mode, stock method, bond, cleaning fee and calendar window.
Good to know
Matching is exact, including spelling and capitalisation.
Only new products are imported. For older products, use Import Products.
Products already imported, products with no type or a different type, and the app's own helper products (bond, cleaning fee, insurance, add-ons) are skipped.
Renamed your product type? Update the workflow to match.
To turn it off, untick the box and save again.
Your Shopify product, variants and pricing are never changed.
Rental products
Edit a rental product
In Rental Products, click the pencil icon to open Edit Product. Each section can override your store defaults for this dress only.
Inventory
Tick Use custom inventory for this product, then choose By Product (set the inventory counter) or By Variant / Size (set a quantity for each size).
See bookings, active holds and blocked dates month by month. Choose a size to see its capacity, for example 1/2 booked.
Bond
Tick Use custom bond for this product and enter an amount.
Cleaning Fee
Tick Use custom cleaning fee for this product and enter an amount.
Sell
Shows the matched sell variant, its live price and inventory. Tick Don't allow this product to be bought when it has upcoming rental orders to override the store default.
Delivery Methods
Tick Use custom delivery methods for this product to offer only some methods.
Pricing
Edit the rental price for each size and duration. Changes sync to the Shopify product as soon as you save.
Accessories
Choose accessories to offer with this dress. Guide
Click Save changes when you're done.
Rental products
Archive products & bulk edit fees
Archive and restore
Click Archive on a product to stop renting it. Its history stays in the Profit Tracker.
To archive several at once, tick them (or All imported) and click Archive selected.
Switch to the Archived tab and click Restore to bring a product back. Products deleted in Shopify can't be restored.
Bulk edit fees
Tick the products you want to change.
Click Bulk edit fees.
Choose Update bond, Update cleaning fee, or both, and enter the new amounts.
Click Apply to selected.
Rental products
Duration-based rentals
With the Fixed durations model, customers pick a rental length from a list, and each length is priced by its Shopify variant.
Set up durations on your products
In Settings → Rental, choose Fixed durations as the rental duration model.
On your Shopify products, add a variant option named exactly Duration, with values like 4 Days and 8 Days. Price each variant.
Import the products into Rental Products. To change prices later, use Pricing in Edit Product.
Add durations in bulk
Already have lots of products without durations? Use Settings → Data → Add Duration Options to Shopify Products:
Set your Rental Duration Fallbacks (for example 4, 8, 12) in Settings → Rental.
Choose the Shopify Product Type to update.
Enter a Price increase for each additional duration. With 4, 8 and 12 days and 40%, the prices become base, base + 40%, and base + 80%, calculated separately for each size.
Click Add missing duration options. Only imported products with an exact type match are updated, in safe batches.
No Duration variant on a product? Customers can still choose from your fallback durations.
Rental products · Settings → Rental
Next business day rentals
A simpler model: there's no duration picker. The customer only picks a start date, and the return date is automatically set to the next weekday (Saturdays and Sundays are skipped). The product's flat rental price is charged.
Go to Settings → Rental.
Under Rental duration model, choose Next business day.
Click Save changes.
Rental products · Settings → Data
Rental inventory CSV import
Set product-level or variant-level rental quantities for many products at once.
Go to Settings → Data and click Import rental inventory CSV.
Click Download CSV template and fill it in. Rows use Shopify IDs to match products.
Upload your file (up to 5,000 rows and 2 MB) and click Validate and preview.
Check the counts for valid rows, rows creating or updating products, unchanged rows and error rows.
Click Confirm and start import. The import runs in the background and the page updates automatically.
This only updates rental inventory in the app. Your Shopify sellable inventory isn't changed.
Bookings
Bookings
Bookings page & statuses
Every rental order placed through your storefront, POS or a manual booking appears in Bookings.
Find bookings
Switch between Active, Recently completed (last 14 days) and Archived.
Search by product, customer or email, filter by status, and sort by Newest first or Send soon first.
The stats show Total Rentals, Shipped, Returned, Cleaning & Repairs, Overdue and Cancelled.
Booking statuses
A typical rental moves through: Paid → Shipped → Returned → Cleaning & Repairs → Completed.
Status
Meaning
Paid / Booked
Confirmed and waiting to go out
Shipped
With the customer or on its way
Returned
Back with you
Cleaning & Repairs
Being cleaned or fixed
Completed
Finished and ready to rent again
Overdue
Not returned by the return date
Cancelled & Refunded / Not Refunded
Cancelled. The dates are released on the storefront calendar.
Archived
Filed away
Want Shopify to update statuses for you? Turn on Track bookings with Shopify in Settings → General.
Bookings
Inside a booking
Click View booking to open it. The booking has these tabs:
Product
The items in the booking, sizes, rental dates and delivery method. Change dates (if date edits are allowed), assign a physical unit, cancel an item, or tick Test order. Test orders stay in Bookings but are left out of Dashboard and Profit Tracker stats.
Customer
Contact details, Instagram handle, attached ID, booking form answers and how long they've been a customer.
Delivery
Delivery and billing addresses, plus tracking numbers. Guide
Payments
Bonds, late fees, costs per item and a payment summary. Guide
History
A log of everything that's happened to the booking.
A Missing info flag on the Payments tab means costs or bond details haven't been entered yet.
Bookings
Add a manual booking
Record bookings taken over the phone, by DM or in person, so they block the calendar.
In Bookings, click Add manual booking.
Choose the rental item: search your imported rental products and pick a size.
Set the booking details: rental dates and status. Dates that are already booked can't be chosen.
Order and payment: enter the Shopify order (for example #1001 or the order URL), the delivery method and the amount paid.
Add customer details: search your Shopify customers, or Enter manually. A new Shopify customer is created if the email doesn't exist yet. You can also Attach ID.
Add delivery details, then click Add booking.
By default, manual bookings must be linked to a Shopify order. To allow bookings without one, turn on Allow local-only booking without Shopify order in Settings → Bookings.
Bookings
Tracking & fulfilment
Open the booking and go to the Delivery tab.
Enter the Tracking Number for the outbound parcel, and the Return Tracking Number for the return parcel.
Save. The tracking is added to the Shopify order, and the order is fulfilled in Shopify with that tracking.
If Shopify rejects the update, the tracking is still saved in the app and a message explains what went wrong.
Bookings
Late fees, bond refunds & costs
Everything money-related lives in the booking's Payments tab.
Refund a bond
Check Bond collected and Remaining bond.
Click the refund bond button, enter the amount and confirm.
The refund is processed on the Shopify order, and the bond shows as Partially refunded or fully refunded.
Bookings with no Shopify order can't be refunded from the app. Handle those refunds outside the app.
Charge a late fee
Enter the Late fee amount. It starts at your default from Settings → Bookings.
Send the customer a late fee reminder, or create a Shopify draft order for the fee to send them.
When they pay, tick Late fee has been paid.
Track costs and profit
Under Costs per Product / Item, enter the Cleaning cost, Repair cost and Other cost for each item. The Payment Summary then shows rental income, cleaning fees, delivery and bonds collected, refunds and profit for the booking. Delivery and transaction fees apply once per booking, not per product.
Bookings
Customer disputes & damage claims
Turn on Enable customer disputes in Settings → Bookings. Each booking then has a Customer Disputes tab.
Open the booking and go to Customer Disputes.
Add a dispute with a title and type: Late return, Missing item, Cleaning issue, Customer complaint or Payment issue.
Describe what happened, set the dispute date and upload Evidence Photos.
Update the status as it progresses, for example Waiting on customer.
When it's settled, add Resolution notes and a Resolution date.
Bookings · Settings → Data
Move from another rental app
Import your current bookings so their dates are blocked from day one.
Export your orders: use Shopify's standard Orders CSV, or a rental export from your old app with Order, Product, Start and End columns. An optional Size column is saved too.
In the app, go to Settings → Data → Import Orders.
Choose your CSV file (5 MB or smaller) and click Import orders.
Review the summary: bookings imported, duplicates skipped, sizes saved, and Shopify orders linked or not found.
Import your rental products before importing orders. Only rows that match an imported rental product are brought in.
Bookings · Availability
Manually block out dates
Booked dates are blocked automatically. Use manual blocking to make a dress unavailable on other dates, for example when it's away for repairs.
In Rental Products, click the pencil icon on the dress.
Under Blocked Out Days, click Add blocked date.
Choose a Start date and, for a range, an End date.
Under Apply blocked dates to, choose All sizes or a specific size.
Click Add, then Save changes. Those dates can no longer be selected on the storefront.
Bookings · Settings → General
Holiday mode
Stop all new bookings across your store for one or more date ranges, for example over Christmas or while you're away.
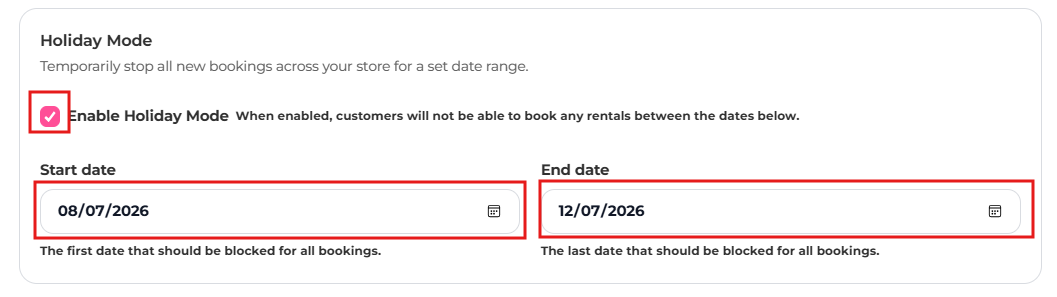
Go to Settings → General and find Holiday Mode.
Tick Enable Holiday Mode.
For each closure, add a range with a Holiday name, a Start date (the first date blocked) and an End date (the last date blocked).
Save. Customers can't book any rentals during those ranges.
Holiday Mode: tick Enable, then set the dates.
Bookings · Settings → General
Terms and conditions checkbox
Require customers to accept your rental terms before completing their booking.
Publish your rental terms as a page on your store and copy its URL.
In the app, go to Settings → General and find Store Policies.
Paste the link into Terms & Conditions URL.
Tick Require terms read at cart.
Save, then test by adding a rental to your cart.
Store Policies: add your terms URL and tick "Require terms read at cart".
Try-ons & in store
Try-ons
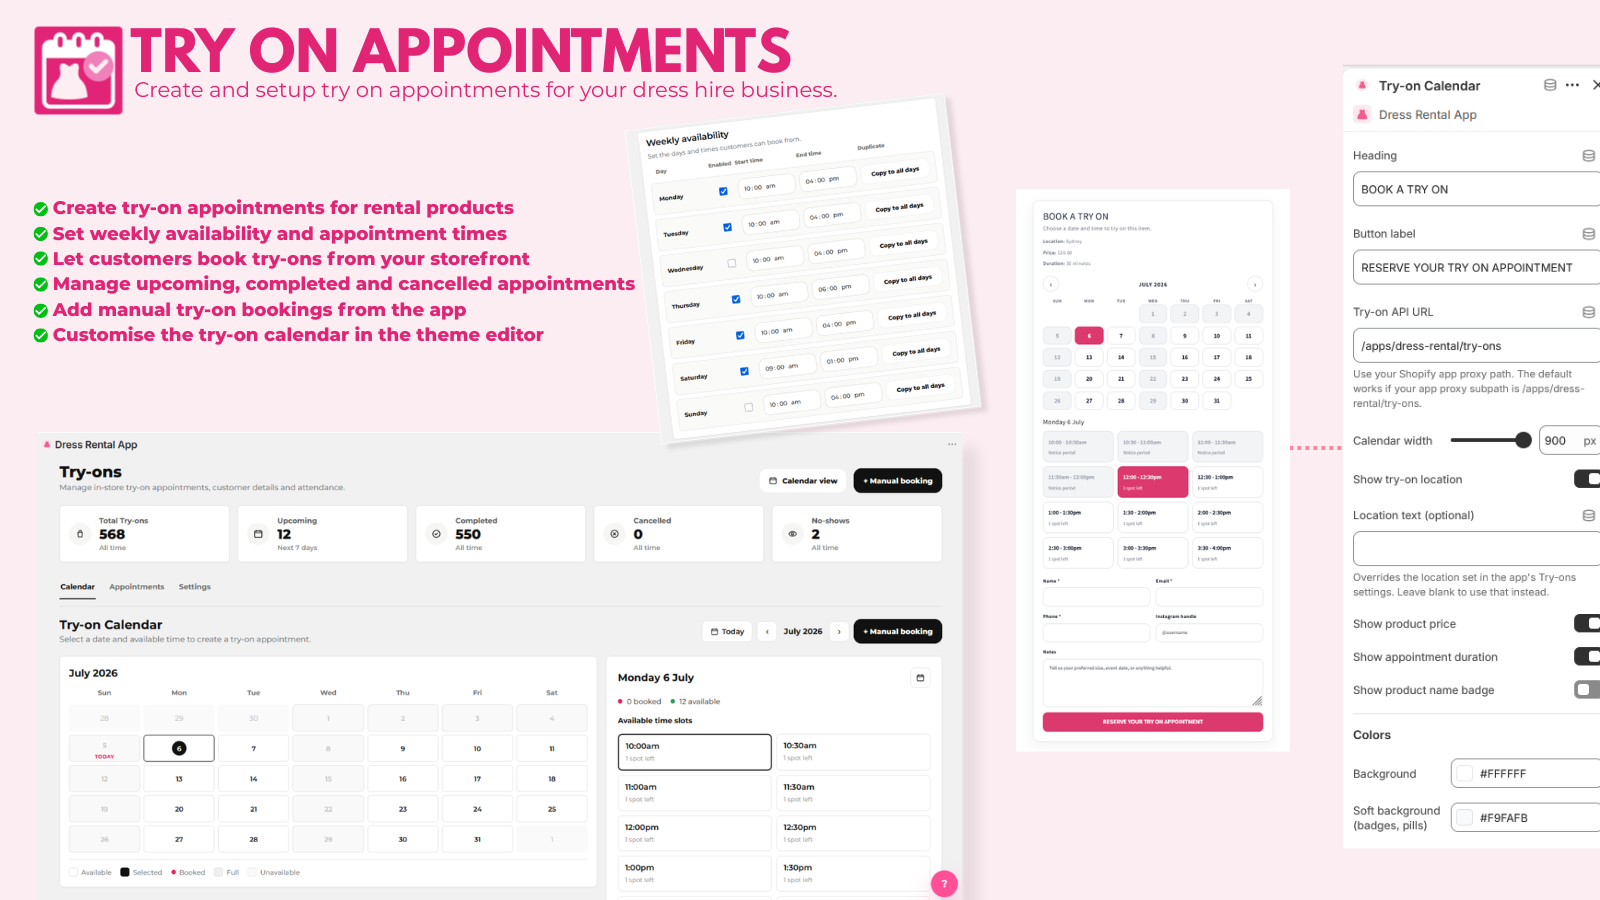
Set up try-on appointments
Let customers book in-store try-ons from your product pages.
1. Link a try-on product
Try-ons are paid through a Shopify product. In Try-ons, click Create Try-On Product, or link an existing Shopify product. Its variant price is what customers pay, with no separate app fee. The try-on calendar stays hidden until a product is linked.
2. Add locations
Under Try-on locations, add each showroom or studio. Each location has its own booking rules, hours and blackout dates.
3. Set booking rules
Enable try-on bookings
Show the try-on calendar on your storefront.
Holiday mode
Pause all try-on bookings without changing your settings.
Try-on location
The address shown to customers.
Appointment duration
How long each slot lasts.
Buffer time
The gap between back-to-back appointments.
Max bookings per slot
How many customers can book the same time.
Booking notice period
Minimum lead time before a slot can be booked.
Booking window
How far ahead customers can book.
Manual booking availability override
Lets staff-created bookings ignore the notice period, window, hours, blackouts, holiday mode and slot limits.
4. Set hours and blackout dates
Under Weekly availability, set the start and end time for each day you take appointments. Under Blackout dates, block specific dates or ranges. Then click Save Settings.
5. Add the calendar to your theme
Add the Try-on Calendar block to your product template. Guide
Try-ons
Manage try-on appointments
Book an appointment for a customer
In Try-ons, open the Try-on Calendar and pick a date and an available time slot.
Enter the customer's name and Instagram handle, and choose the dress.
Optionally link a Shopify order and choose the payment method: No payment, Manual payment, Bank transfer or Shopify order.
Save to book it.
Manage appointments
Under All Appointments, click any appointment to see its details and the customer's history. From there you can:
Edit appointment: move it to a new date and time.
Update status, for example for a cancellation or no-show.
Download calendar event to add it to your own calendar.
Save payment details or open the linked Shopify draft order.
Delete appointment.
Customers who chose Anything available want to try whatever is available that day.
Try-ons · Theme editor
Try-on Calendar block
In Online Store → Themes → Customize, open your product template.
Add the Try-on Calendar app block.
Adjust its settings and save.
Content
Style preset, heading, instruction text and button label.
Let customers select multiple garments
Allow more than one dress per appointment.
Details
Show or hide the try-on location, product price and appointment duration.
Layout
Calendar width, block alignment and text alignment.
Colours
Background, borders, text, accent, buttons, disabled states and success or error messages.
Try-ons
Google Calendar sync
Automatically create, reschedule and remove Google Calendar events for try-on appointments.
In Try-ons, find Google Calendar.
Connect the Google account that owns the calendar your showroom or staff use.
Choose the calendar to sync to.
Tick Synchronize try-on appointments and save. New bookings, reschedules and cancellations now update Google Calendar automatically.
In store
Shopify POS rentals
Create rental bookings in store and take payment through Shopify POS, using the same availability as your website.
In Shopify POS, tap the Rental booking tile on the home screen. Add it to your home screen first if it isn't there.
Tap Create rental.
Dress, size and duration: search for and choose the dress, then its size and duration.
Choose the start date on the rental calendar. Only available dates are shown.
Choose the Delivery method.
Review charges with customer: rental price, cleaning fee, delivery charge and refundable bond. Get the customer's agreement before continuing.
Change the widget's wording and colours in two places.
In the app: Booking Fields & Add Ons
The Widget tab controls:
Calendar Title And Variants
Where the Size, Duration and Delivery Method labels sit, plus their colours.
Calendar Colours
Calendar and card backgrounds, selected date, unavailable dates and date numbers.
Calendar Availability
Tick Show quantities on calendar and set labels. Use {count} where the number goes, for example {count} left.
Date Summary
The Delivery / Return label, border and background.
Pricing And Terms Text
Text colour for prices, totals and terms.
Add to Cart Button
Button label and colours.
Accessory Popup Button
Colours of the Add accessory / Remove accessory button.
Booking Details
Colours for booking fields, icons, inputs and the Choose File button.
The Messages tab controls the Unavailable Dates Message popup shown when customers pick booked dates: its reason and tip text, button label, colours, font sizes, corner radius and overlay. A live preview shows your changes.
In the theme editor: Rental Widget block
Click the Rental Widget block on your product template for layout options: style preset, widget width, padding, text above the calendar, whether to show the size, colour, duration and delivery selectors (and their styles), delivery method position, the delivery/return summary card, start and end date labels, and colours.
A heading set on the theme block overrides the one from the app.
Storefront · Booking Fields & Add Ons
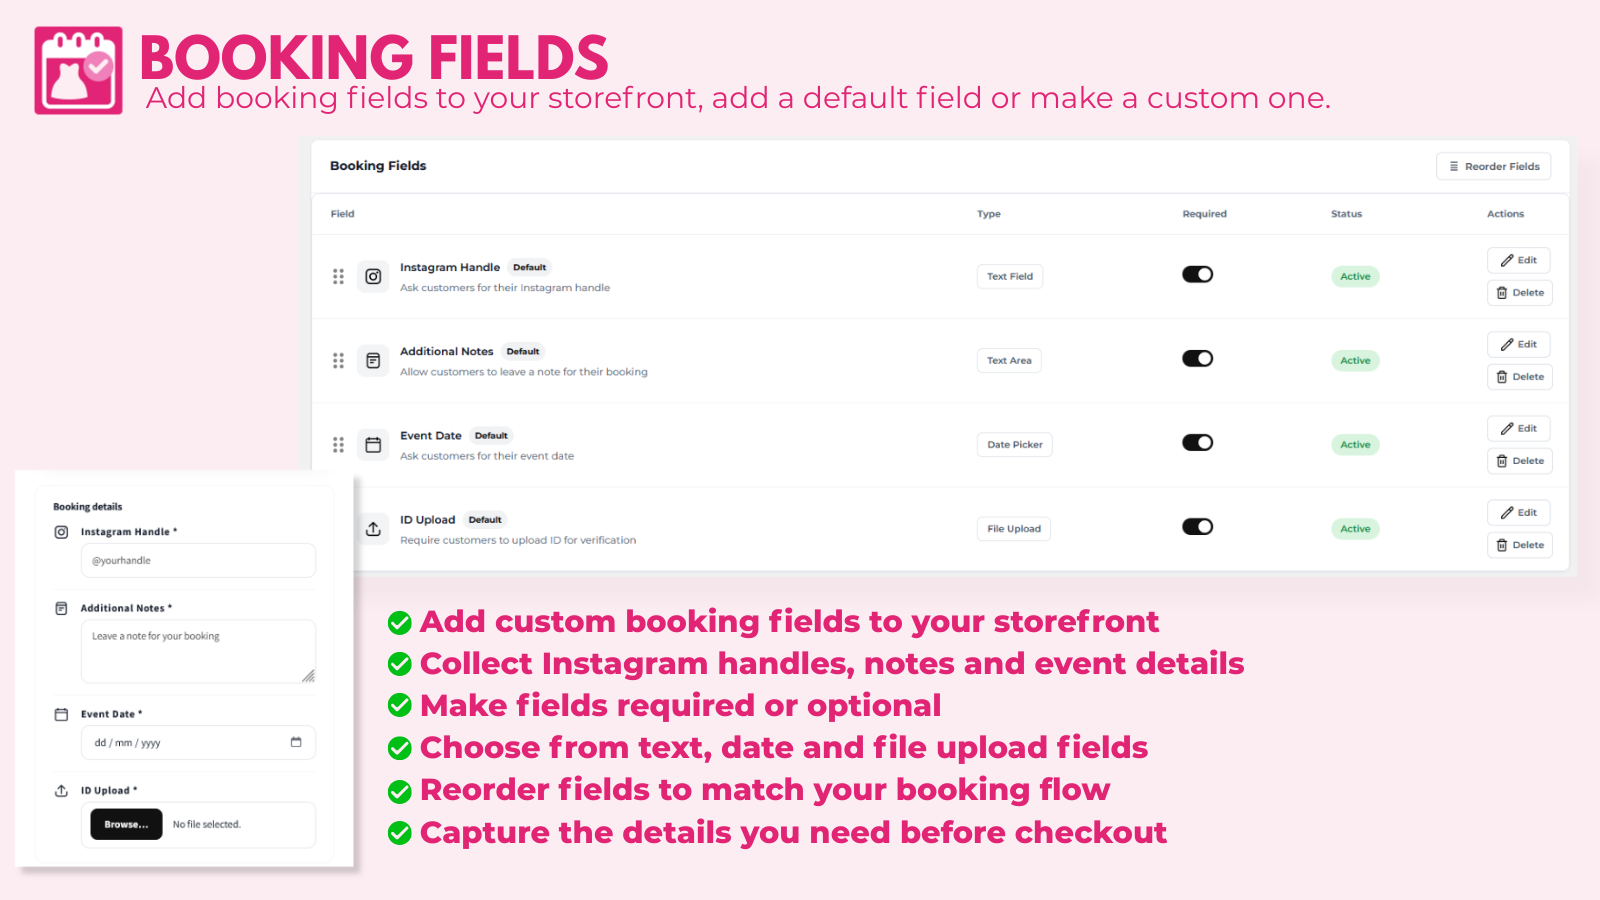
Booking form fields
Collect extra details from customers when they book. Go to Booking Fields & Add Ons → Booking Form Fields.
Ready-made fields
Instagram Handle
Additional Notes: a note for the booking
Event Date
ID Upload: customers upload ID for verification
Add a custom field
Click Add Custom Field, or Pick from defaults.
Enter the Field Label (for example Body measurements).
Choose a type: Text Field, Text Area, Date Picker or File Upload.
Add help text and placeholder text, and choose whether it's required.
Save.
You can make all fields required or optional at once. Customers' answers appear in the booking's Customer tab.
Collecting ID? Mention it in your store's privacy policy. See Data & privacy for how long ID images are kept.
Storefront · Booking Fields & Add Ons → Add-ons
Insurance, custom add-ons, upsells & accessories
Rental insurance
Earn extra revenue from an optional insurance add-on. Enable insurance, then set the Insurance Label, Insurance Price, a description of what's covered, and an optional picture (PNG, JPEG or WEBP up to 3MB). When disabled, insurance is hidden from the widget.
Custom add-ons
An optional extra charge customers can add to their rental. Set the label, a price above $0, a description and an optional picture.
Upsells
Offer Shopify products that complement a rental, such as fashion tape. Add the products, then click Save Upsells.
Accessories
Offer rentable accessories (bags, jewellery and so on) alongside a dress, with availability checked for the same dates.
Import the accessories into Rental Products first.
In Add-ons → Accessories, choose the accessory products, or add a whole collection.
Set the Storefront heading, for example Match this dress with one of our accessories.
Save. Customers can add or remove accessories from the product page.
Bonds and cleaning fees are set in Settings → Rental, and per product in Edit Product. The app uses its own helper products in Shopify for these charges.
Storefront · Starter plan and above
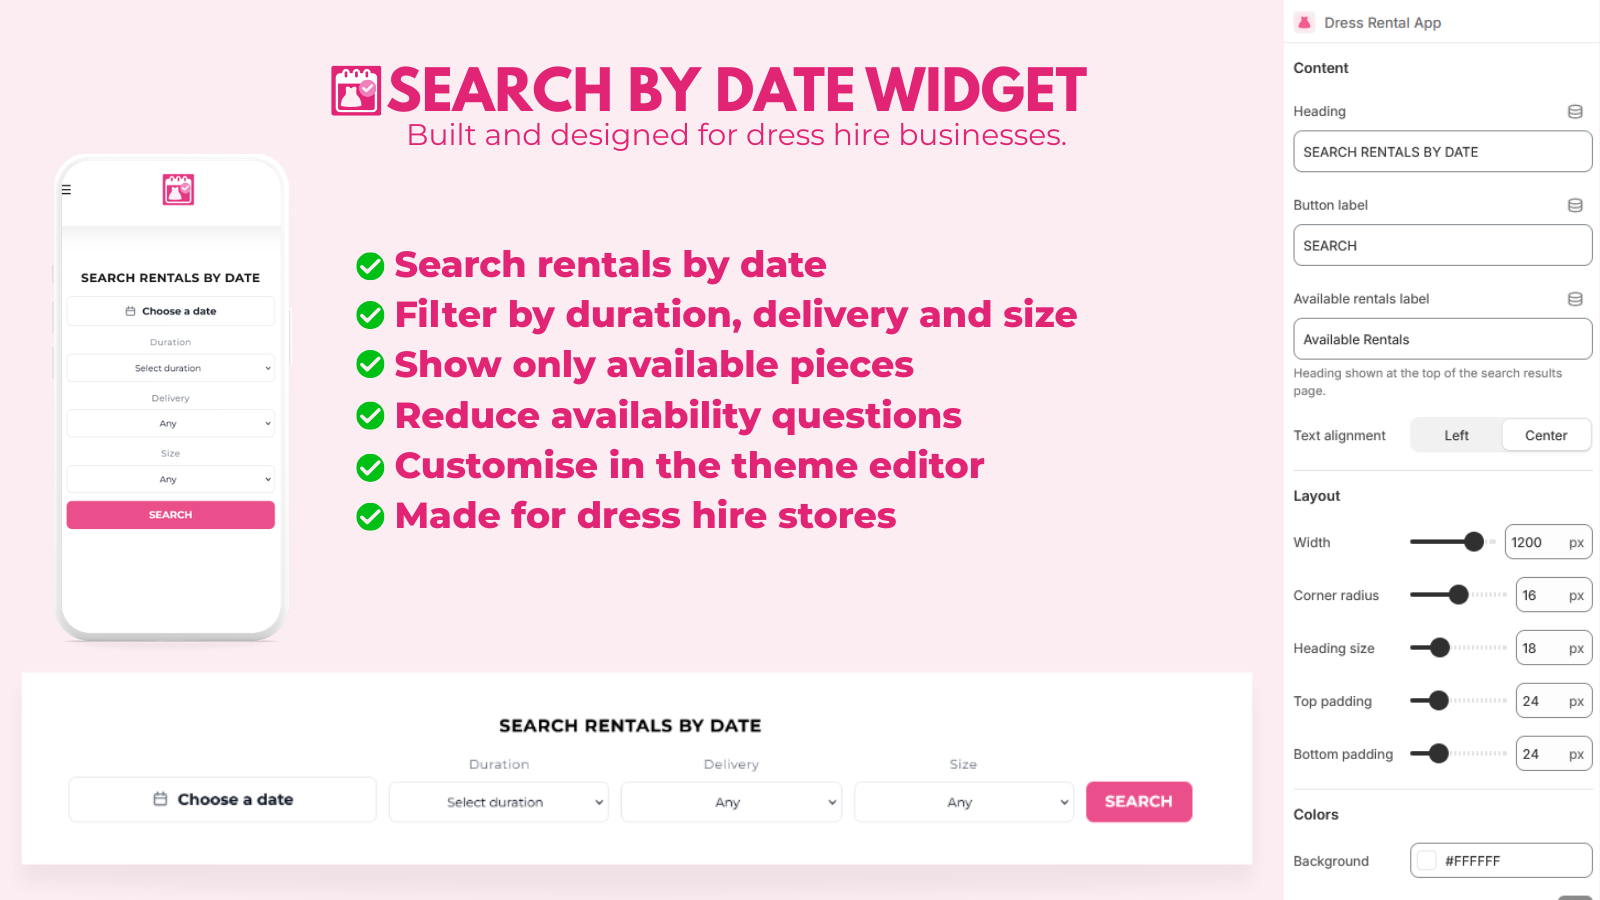
Search by Date widget
A storefront search where customers choose their date, duration, delivery method and size, then see only the dresses available.
Set it up
Go to Booking Fields & Add Ons → Search by Date.
Start with a preset: Preset 1, Image hero, Split hero, Editorial hero, Card layout or Popup icon.
Adjust the Search bar content labels and the Search bar style (width, height, spacing, corners and colours).
For hero layouts, add Hero content: images or video, heading and buttons.
Under Mobile behaviour, choose whether phones show a search icon that opens the search panel.
Save. Your settings sync to the theme block.
Click Open theme editor and add the Search by Date app block to a section, for example on your home page.
Advanced users can add Custom CSS, scoped to .dr-search-widget.
Search by Date isn't included on the Free plan. The block only appears in the theme editor on Starter or above.
Storefront · Quote Requests
Quote requests: Request a Dress, Vacation Capsule & Price Match
Take enquiries from customers and reply with a quote. Everything lands in Quote Requests, sorted into tabs.
Request a Dress (Starter plan and above)
Customers describe a dress they're looking for, share a reference link, size, preferred dates and budget. Add the Request a Dress block from Apps in the theme editor. You can change every label, show or hide fields, and change colours and spacing.
Vacation Capsule (Starter plan and above)
Customers request a curated holiday wardrobe by sharing travel dates, destination, trip length, budget, occasions and pieces they like. Add the Vacation Capsule block, choose a Pieces collection, and edit the "How it works" steps, form fields and budget options.
Price Match
Customers send a cheaper, comparable listing from another dress hire store. Turn it on with Enable price match requests in Settings → Rental. Each request shows your price, the competitor's price and the customer's notes.
Reply to requests
Open Quote Requests and choose a tab. Search by dress, customer or destination.
Open a request and click Send quote to customer. For a capsule, enter the total price and pieces included.
Mark the request as quoted or closed.
New request notifications go to your store's contact email address.
Reports & plans
Dashboard
Dashboard
An overview of your rental business. Change the date range at the top (the default is the last 30 days) and everything updates.
Total Sales
Rentals, bonds, fees and late fees from orders placed in the range.
Total Profit
Sales minus refunds and costs.
Total Try-On Sales
Try-ons ordered through your storefront.
Amount of Dresses Booked
Bookings this month.
Top Performing Dress / Customer Favourite
Your highest-earning and most-booked dresses.
Consider Selling
Dresses that may be worth selling.
Booking stats
Total Rentals, Shipped, Returned, Cleaning & Repairs, Overdue and Cancelled.
Inventory snapshot
Total Products, Low Stock Items, Fully Booked and In Cleaning.
Lists & calendar
Upcoming rentals, returns due, cleaning queue and overdue rentals, plus a calendar view.
Staff assistant
Ask the built-in assistant questions like What needs attention today?, Show overdue rentals or Summarise this week's stats, or ask where to find a setting.
Test orders are excluded from Dashboard numbers.
Profit Tracker · All plans
Profit tracker
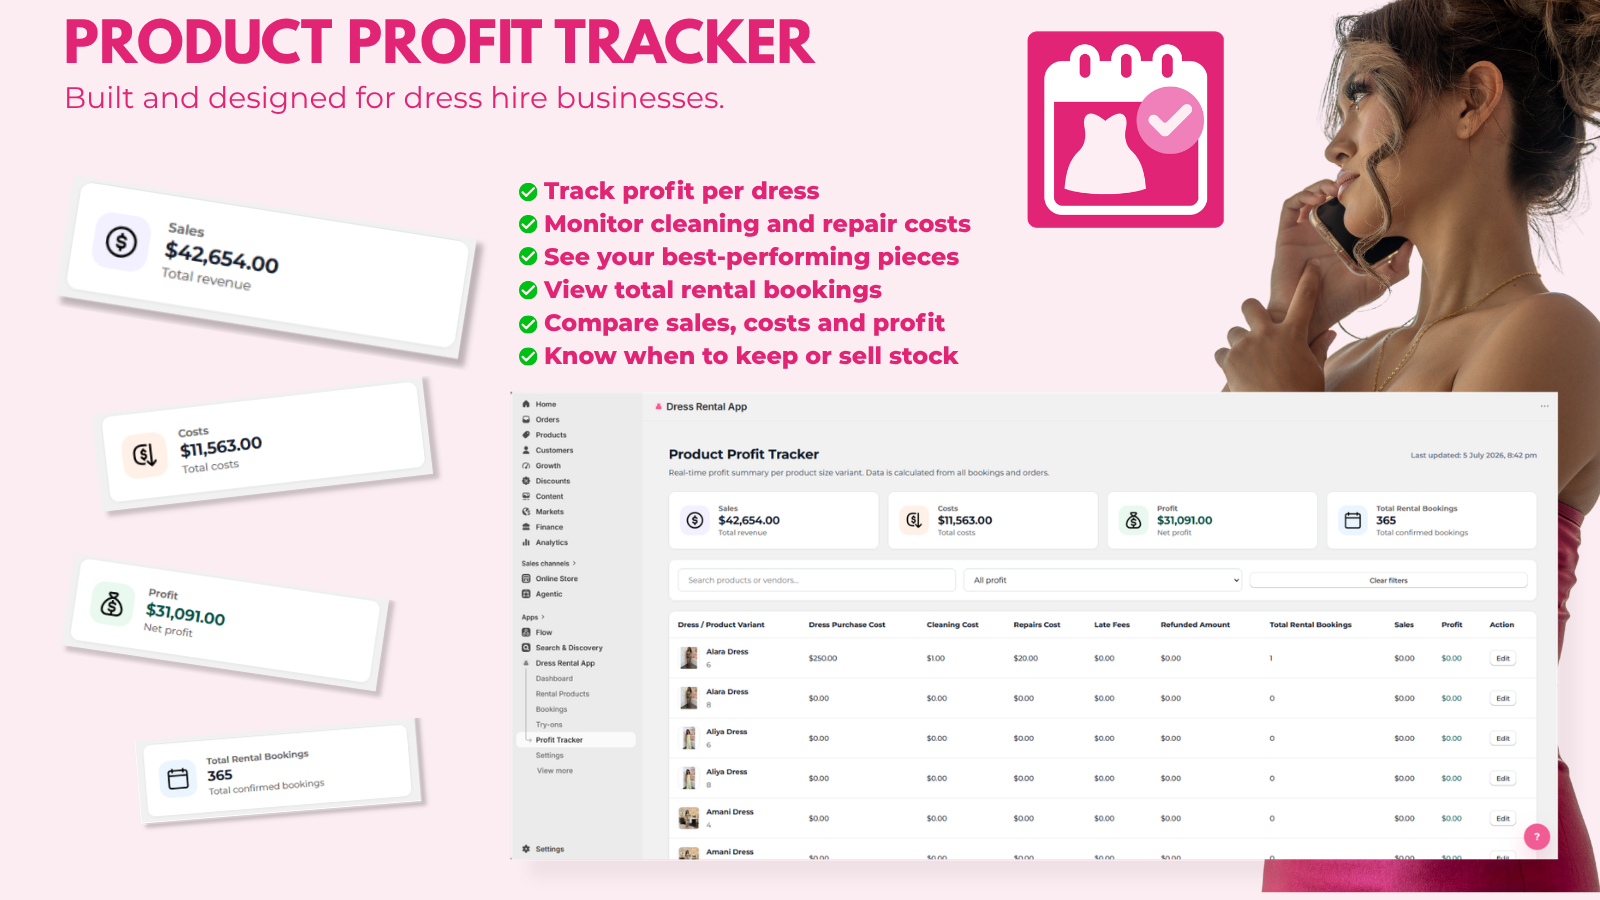
See how profitable each dress really is. The summary shows Total revenue, Total costs, Net profit and Total Rental Bookings.
What's tracked for each dress or variant
Dress Purchase Cost: what you paid for it. Enter it to measure payback.
Cleaning Cost, Repairs Cost and Other Costs: entered on each booking's Payments tab.
Late Fees and Refunded Amount.
Tips
Search products or vendors, and filter to No sales to find dresses that aren't renting.
Click Show where these numbers come from for a breakdown.
The product type must match exactly, including capitalisation.
The product must have been created after you enabled the workflow. Import older products with Import Products.
I changed a product in Shopify but the app shows old details
Go to Settings → Data and click Sync Shopify data.
Imported dresses have the wrong bond or cleaning fee
Products keep the settings in place when they were imported. Fix several at once with Bulk edit fees, or edit each product.
Emails aren't sending
In Settings → Notifications, check Enable automatic rental emails and Send customer emails are on, the template is enabled, and a reply-to email is set. Then use Send test.
Bookings are missing after a reset or migration
Use Link Bookings To Existing Shopify Orders or Import Orders in Settings → Data.
The Search by Date block isn't in my theme editor
Search by Date, Request a Dress and Vacation Capsule need the Starter plan or above. See Plans.
Customers see a booking limit message
You've used this month's bookings for your plan. Upgrade to lift the limit.
Help
FAQ
Can I use this alongside another rental app?
No. Disable or uninstall other rental apps first to prevent conflicts. See Before you start.
Can I track stock by size?
Yes. Choose Inventory by Variant in rental settings, or set it per product.
Can customers buy a dress as well as rent it?
Yes. Turn on Enable Sell Variant and add the sell label (for example Buy) to a variant title. See Rental settings.
Can I charge different prices for different rental lengths?
No. The rental widget has no app name, logo or watermark on any plan.
Does the app work with Shopify Checkout and customer accounts?
Yes. The app works with Checkout, Customer accounts, Shopify POS and Shopify Admin.
Help
Data & privacy
The app never sells customer data or uses it for advertising or profiling. Data is encrypted in transit and at rest. Personal data is kept for these periods:
Data
Kept for
Unfinished bookings and ID uploads
48 hours
ID uploads on completed bookings
30 days after the rental ends
Personal details on completed, cancelled or refunded bookings
730 days after the rental ends
Personal details on past try-ons
180 days after the appointment
Customer data requests
When a customer asks Shopify for their data, the request appears in Settings → Data → Customer Data Requests. Shopify requires these to be completed within 30 days.
Click Download secure JSON to get the customer's rental bookings and try-on records.